Upgrade OpenResty Edge
We recommend that before upgrading a production environment, you should use the data from the production environment to build a test environment that is identical to the production environment for upgrade testing. After confirming the test result, you can proceed to upgrade the production environment. For detailed steps, please refer to Cloning OpenResty Edge Environment.
1. Upgrade Log Server DB
Notice
If your Log Server and Edge Admin are deployed on the same machine, please perform 3. Upgrade Edge Node first.If you would like to perform an online upgrade (recommended), you can directly download the installer by executing the following command:
curl -O https://openresty.com/client/oredge/openresty-edge-installer.shIf you prefer to upgrade using a bundle package
Please download the following file from the Download Center, if not available please contact us:
a.
openresty-edge-bundle-VERSION.tar.gz: Contains OpenResty Edge business package, configuration package, and initial data. The old name wasopenresty-edge-bundle-VERSION.tar.gz.Extract
openresty-edge-bundle-VERSION.tar.gzand enter the extracted directory:tar xf openresty-edge-bundle-VERSION.tar.gz cd openresty-edge-bundle-VERSION
Run the installer:
sudo /bin/bash openresty-edge-installer.shEnter the action you wish to perform:
Upgrade> Checking network... > Welcome to the OpenResty Edge Installer. [1] Install [2] Upgrade [3] Downgrade [4] Uninstall [5] Self Check [6] Get Default Info What would you like to do? 2 > You chose: Upgrade.Enter the version you want to upgrade to (you can get the latest version info from the Release Notes), if using the default version in the installer, simply press Enter:
Which version would you like to upgrade to? (Default: 23.12.1, Press Enter to use the default version)
[WARN] Using default version number: 23.12.1
Enter the component you wish to upgrade:
Log Server DB[WARN] If you haven't performed an upgrade test yet, we strongly recommend that you conduct one before proceeding. For details, please visit: https://doc.openresty.com/en/edge/edge-installation-upgrade/edge-env-clone/. [1] Edge Log Server Database [2] Edge Log Server [3] Edge Node [4] Edge Admin Database [5] Edge Admin [6] Rebuild [7] Clean db after upgrade [8] Exit What would you like to do? 1 > You chose: Edge Log Server Database.If successful, you will see the following message:
Great! update log-server database successfully.
2. Upgrade Log Server
The steps are the same; when upgrading, choose the
Log Servercomponent:[WARN] If you haven't performed an upgrade test yet, we strongly recommend that you conduct one before proceeding. For details, please visit: https://doc.openresty.com/en/edge/edge-installation-upgrade/edge-env-clone/. [1] Edge Log Server Database [2] Edge Log Server [3] Edge Node [4] Edge Admin Database [5] Edge Admin [6] Rebuild [7] Clean db after upgrade [8] Exit What would you like to do? 2 > You chose: Edge Log Server.If successful, you will see the following message:
Great! Upgrade openresty-edge-log-server successfully.
3. Upgrade Edge Node
3.1 Back Up Edge Node Database
If your current OpenResty Edge Admin version is less than 1.3.0, skip this step.
- Log in to the OpenResty Edge Admin console.
- Navigate to [Gateway Cluster]-[Backup and Restore]-[Start Backup].
3.2 Migrate Traffic (Optional)
To avoid impacting business, before upgrading the Edge Node, redirect the traffic from this node to other nodes that have not been upgraded yet. This step is optional, but we strongly recommend executing this step for the first few Edge Nodes being upgraded:
- Redirect traffic away.
- Upgrade.
- Verify.
After ensuring there’s no problem, proceed with upgrading the remaining Edge Nodes. Additionally, pay attention to the error logs during the upgrade process.
If OpenResty Edge’s DNS is controlling the traffic, follow these steps to take the Edge Node that’s about to be upgraded offline:
- Enter the OpenResty Edge console.
- Go to the [Gateway Cluster] page.
- Edit the cluster where the node is located.
- Modify the node’s [status] to [Disable DNS, disable caching cluster].
- Save.
Wait until the node has no traffic or only minimal traffic. This can be determined by looking at the access logs:
tail -f /usr/local/oredge-node/logs/access.log
3.3 Upgrade
The steps are the same; when upgrading, choose the
Edge Nodecomponent:[WARN] If you haven't performed an upgrade test yet, we strongly recommend that you conduct one before proceeding. For details, please visit: https://doc.openresty.com/en/edge/edge-installation-upgrade/edge-env-clone/. [1] Edge Log Server Database [2] Edge Log Server [3] Edge Node [4] Edge Admin Database [5] Edge Admin [6] Rebuild [7] Clean db after upgrade [8] Exit What would you like to do? 3 > You chose: Edge Node.If successful, you will see the following message:
Great! Upgrade openresty-edge-node successfully.
4. Upgrade Edge Admin Database
The steps are the same; when upgrading, choose the
Edge Admin DBcomponent:[WARN] If you haven't performed an upgrade test yet, we strongly recommend that you conduct one before proceeding. For details, please visit: https://doc.openresty.com/en/edge/edge-installation-upgrade/edge-env-clone/. [1] Edge Log Server Database [2] Edge Log Server [3] Edge Node [4] Edge Admin Database [5] Edge Admin [6] Rebuild [7] Clean db after upgrade [8] Exit What would you like to do? 4 > You chose: Edge Admin DB.
Notice
Before executing the backup command, please check if there is enough disk space.Back up the Edge Admin database.
Do you want to backup db? [Y/N]: yIf successful, you will see the following message:
Great! update admin database successfully.
5. Upgrade Edge Admin-web
Choose either this step or 7. staging upgrade Edge Admin-web.
If you have configured double admin-web and want to staging upgrade the Edge Admin-web service, you can jump to 7 staging upgrade Edge Admin-web.
The procedure is the same, with the component
Edge Adminselected for the upgrade[WARN] If you haven't performed an upgrade test yet, we strongly recommend that you conduct one before proceeding. For details, please visit: https://doc.openresty.com/en/edge/edge-installation-upgrade/edge-env-clone/. [1] Edge Log Server Database [2] Edge Log Server [3] Edge Node [4] Edge Admin Database [5] Edge Admin [6] Rebuild [7] Clean db after upgrade [8] Exit What would you like to do? 5 > You chose: Edge Admin.If successful, the following prompt will be displayed at the end
Great! Upgrade openresty-edge-admin successfully.
6. Recompile
The procedure is the same, with the component
Rebuildselected for the upgrade[WARN] If you haven't performed an upgrade test yet, we strongly recommend that you conduct one before proceeding. For details, please visit: https://doc.openresty.com/en/edge/edge-installation-upgrade/edge-env-clone/. [1] Edge Log Server Database [2] Edge Log Server [3] Edge Node [4] Edge Admin Database [5] Edge Admin [6] Rebuild [7] Clean db after upgrade [8] Exit What would you like to do? 6 > You chose: Rebuild.Recompile a few applications that do not contain wildcard domains with less traffic first. Recompile several high-traffic applications that do not contain wildcard domains later.
Do you want to rebuild one application for test? [Y/N]:  y
Please input the application id: 1
rebuild application 1
Continue to follow the prompts to compile
Do you want to rebuild upgrade config? [Y/N]:  y
rebuild upgrade config
recompile upgrade configurations successfully

Do you want to rebuild all wildcard apps? [Y/N]:  y
rebuild all wildcard apps

Do you want to rebuild all apps? [Y/N]:  y
Do you want to compile concurrently? [Y/N]:  n
rebuild all apps

Do you want to rebuild all http_proxy apps? [Y/N]:  y
rebuild all http_proxy apps

Do you want to rebuild all socks5_apps? [Y/N]:  y
rebuild all sock5_proxy apps

Do you want to rebuild global? [Y/N]:  y
rebuild global
recompile global successfully

Do you want to rebuild waf? [Y/N]:  y
rebuild waf
recompiled all of the WAF rule sets successfully.

Do you want to rebuild dns? [Y/N]:  y
rebuild dns
recompile dns successfully.

Do you want to rebuild global-action? [Y/N]:  y
rebuild global-action
recompile global action successfully

Do you want to rebuild gateway? [Y/N]:  y
rebuild gateway
recompiled gateway successfully

rebuild done!
If the whole system behaves normally, the upgrade is complete!
This step may take longer to compile when there are many HTTP/HTTPS applications.
Do you want to rebuild all apps? [Y/N]: y
We can choose concurrent compilation, which will start 4 processes to compile.
Do you want to compile concurrently? [Y/N]: y
If that is not fast enough, you can modify the installer to specify a larger concurrency, but not larger than 8, e.g.
sudo /bin/bash utils/parallel-recompile.sh 8
7. staging upgrade Edge Admin-web
Choose either this step or 5. Upgrade Edge Admin-web.
There are two prerequisites for staging upgrade of Edge Admin-web.
- You have installed and configured double admin-web.
- Current version of Edge Admin-web (before upgrade) is not lower than 1.3.0-1.
The architecture diagram is as follows.
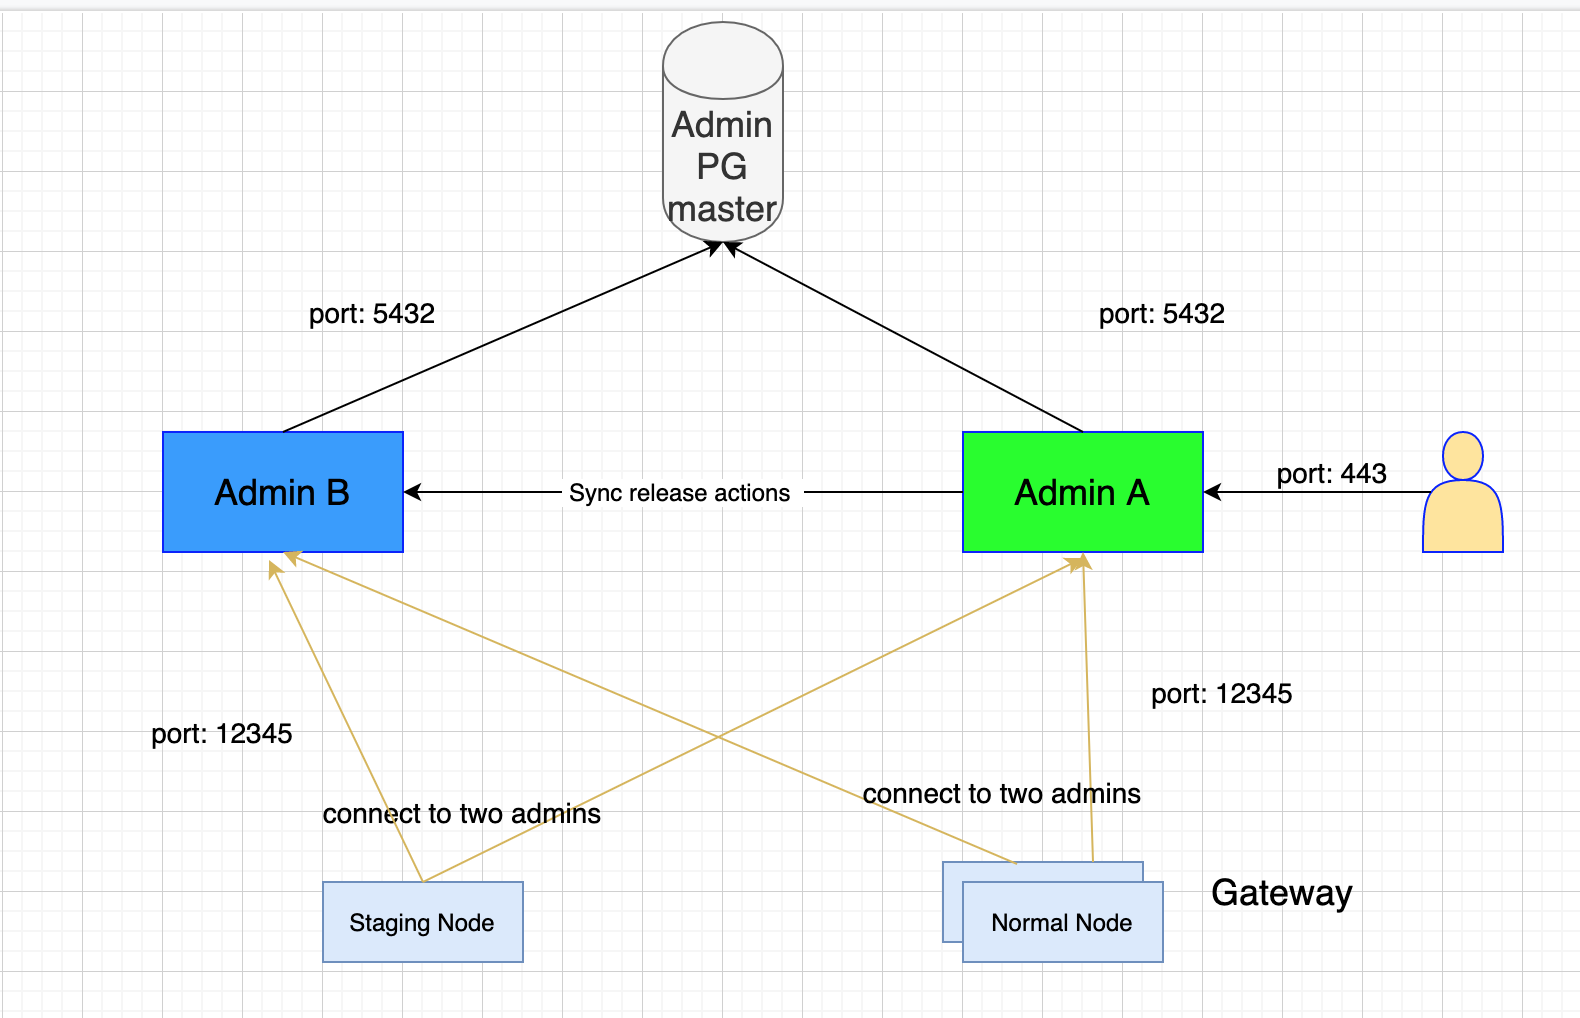
The key differences compared to the dual master Edge Admin-web:
- Edge Admin-B is a new version, which allows release to staging nodes with the new features, thus staging the Edge Admin-web.
- Edge Admin-A is the old version, which still provides the services of the old version. And upgrades to the dual-master state after the new version has been confirmed work well.
The specific steps are as follows.
Divide roles between the two Edge Admin-webs, for example, Edge Admin-A and Edge Admin-B in the above diagram.
Edge Admin-A will not be upgraded during the staging period, so please ensure that the web, REST API calls, and SDK calls are using Edge Admin-A. Edge Admin-B will refuse to provide web services but will still be able to communicate with edge-node normally so that the node side will remain dual master.
Configure Edge Admin-B as the staging role and upgrade to the new version
Modify config.ini to change the
rolefield tostaging. The example configuration for theclone_adminsegment in config.ini is as follows.# Configuration file: /usr/local/oredge-admin/conf/config.ini [clone_admin] host = "IP-of-Edge Admin-A" role = "staging"Upgrade method reference 5. Upgrade Edge Admin-web.
Configure the other Edge Admin A role as
mainModify config.ini to change the
rolefield tomain. An example of the configuration of theclone_adminsegment of config.ini is as follows.# Configuration file: /usr/local/oredge-admin/conf/config.ini [clone_admin] host = "IP-of-Edge Admin-B" role = "main"Restart Edge Admin-A.
sudo systemctl reload oredge-adminOn Edge Admin B, recompile the application and global configuration
See 6. Recompile for the steps.
After completion, observe for a while, and if there are problems, go to Rollback I.
Restore the Edge Admin B role to dual master
Modify config.ini to change the
rolefield tonormal. An example configuration for theclone_adminsegment in config.ini is as follows.# Configuration file: /usr/local/oredge-admin/conf/config.ini [clone_admin] host = "IP-of-Edge Admin-A" role = "normal"Restart Edge Admin-B.
sudo systemctl reload oredge-adminRestore Edge Admin A’s role to the dual master, upgrade to the new version, and recompile the application and global configuration
Modify config.ini to change the
rolefield tonormal. An example configuration for the ``clone_admin`’ segment in config.ini is as follows.# Configuration file: /usr/local/oredge-admin/conf/config.ini [clone_admin] host = "IP-of-Edge Admin-B" role = "normal"Upgrade method reference 5. Upgrade Edge Admin.
See 6. Recompile for steps.
If all business indicators behave properly, the upgrade is complete! You can now use Edge Admin-A and Edge Admin-B as dual masters again.
If there are problems goto Rollback II
7.1 Edge Admin-web Rollback I
Restore Edge Admin-A to a dual master role, restart the service, and recompile the application and global configuration
Modify config.ini to change the
rolefield tonormal. An example configuration for theclone_adminsegment in config.ini is as follows.# Configuration file: /usr/local/oredge-admin/conf/config.ini [clone_admin] host = "IP-of-Edge Admin-B" role = "normal"Restart Edge Admin-A.
sudo systemctl reload oredge-adminSee 6. Recompile for recompiling steps. Note: At this point, you can prioritize the recompile step that caused the error and restore the service as quickly as possible.
Restore the Edge Admin B role to dual master and roll back the version
Modify config.ini to change the
rolefield tonormal. An example configuration for theclone_adminsegment in config.ini is as follows.# Configuration file: /usr/local/oredge-admin/conf/config.ini [clone_admin] host = "IP-of-Edge Admin-B" role = "normal"Downgrade method.
curl -O https://openresty.com/client/oredge/downgrade-openresty-edge.sh
sudo /bin/bash downgrade-openresty-edge.sh OLD_PACKAGE_VERSION [OLD_PLUS_VERSION]

# e.g.:
#  sudo /bin/bash downgrade-openresty-edge.sh 1.1.0-0
#  sudo /bin/bash downgrade-openresty-edge.sh 1.1.0-0 1.19.9.1.3-1
Downgrade complete!
7.2 Edge Admin-web Rollback II
Rollback Edge Admin A and recompile
At this point, Edge Admin A is already in dual-master mode, and you only need to downgrade the version of Edge Admin A Downgrade in the same way as above.
curl -O https://openresty.com/client/oredge/downgrade-openresty-edge.sh
sudo /bin/bash downgrade-openresty-edge.sh OLD_PACKAGE_VERSION [OLD_PLUS_VERSION]

# e.g.:
#  sudo /bin/bash downgrade-openresty-edge.sh 1.1.0-0
#  sudo /bin/bash downgrade-openresty-edge.sh 1.1.0-0 1.19.9.1.3-1
See 6. Recompile for recompiling steps. Note: At this point, you can prioritize recompiling the step that caused the error and restore the service as soon as possible.
Rolling back Edge Admin B
Downgrade in the same way as above.
curl -O https://openresty.com/client/oredge/downgrade-openresty-edge.sh
sudo /bin/bash downgrade-openresty-edge.sh OLD_PACKAGE_VERSION [OLD_PLUS_VERSION]

# e.g.:
#  sudo /bin/bash downgrade-openresty-edge.sh 1.1.0-0
#  sudo /bin/bash downgrade-openresty-edge.sh 1.1.0-0 1.19.9.1.3-1
Downgrade complete!
8. After Upgrade
After the previous steps have been performed and validated, this step can be performed to clean up database fields that are no longer needed or to add constraints to database fields.
The procedure is the same, with the component
Clean db after upgradeselected for the upgrade[WARN] If you haven't performed an upgrade test yet, we strongly recommend that you conduct one before proceeding. For details, please visit: https://doc.openresty.com/en/edge/edge-installation-upgrade/edge-env-clone/. [1] Edge Log Server Database [2] Edge Log Server [3] Edge Node [4] Edge Admin Database [5] Edge Admin [6] Rebuild [7] Clean db after upgrade [8] Exit What would you like to do? 7 > You chose: Clean db after upgrade.If successful, the following prompt will be displayed at the end
Great! upgrade admin database successfully.
If you have any questions, please get in touch with us.