Building a High-Availability Database Cluster for OpenResty Edge
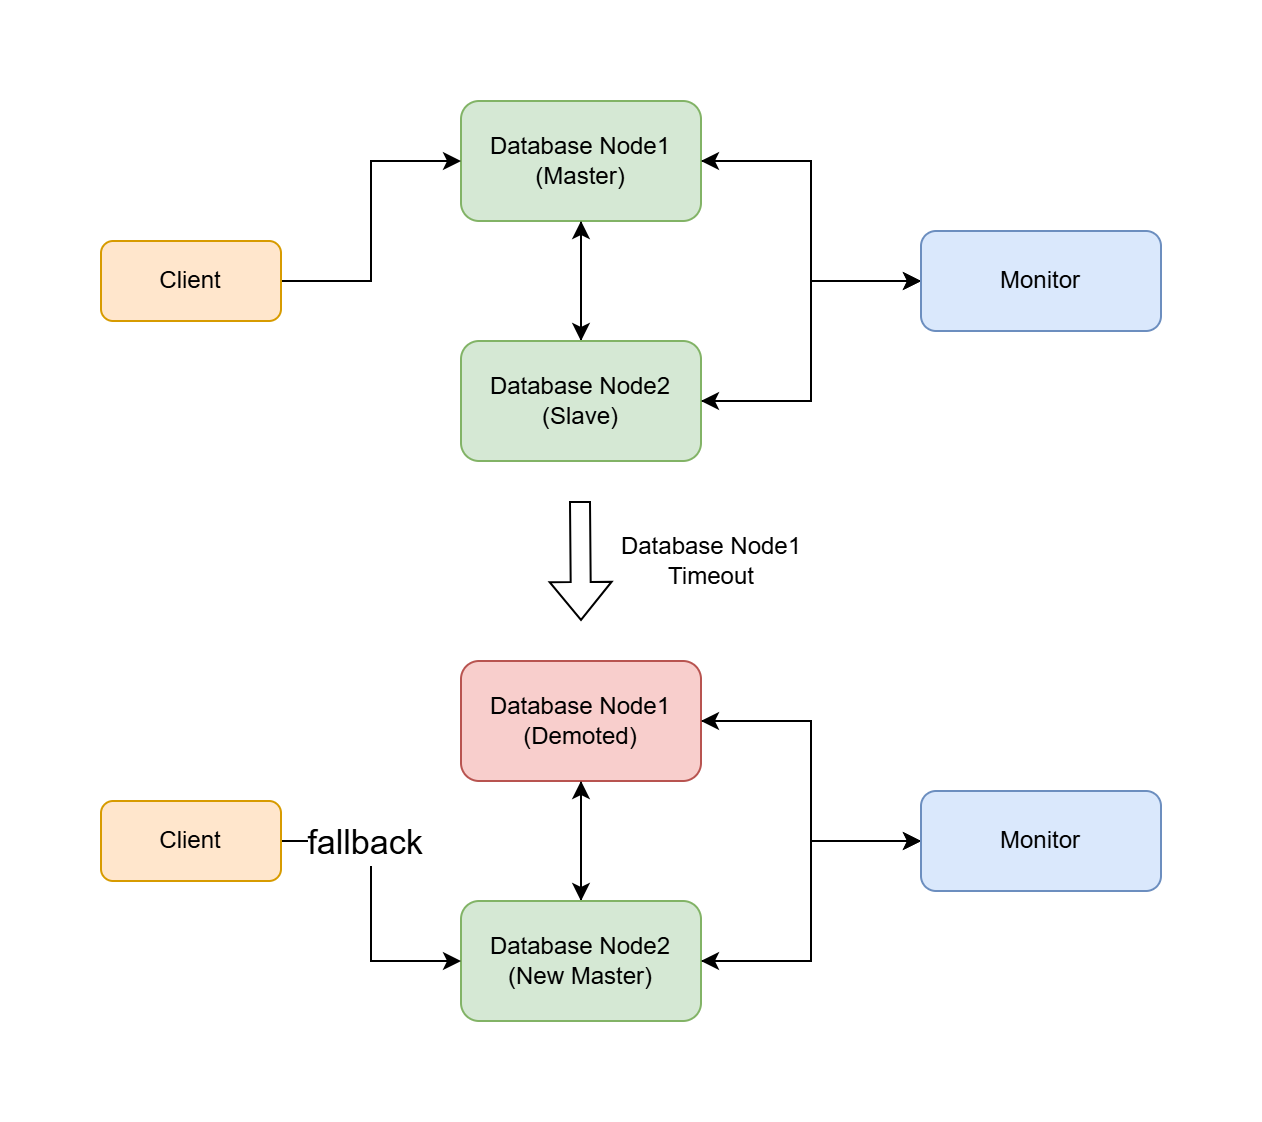
This document introduces a high-availability database cluster solution that supports automatic primary-secondary failover. This solution can automatically promote a secondary database to become the new primary in case of primary database failure, ensuring database service continuity.
The following steps apply to the configuration of both OpenResty Edge Admin Database and OpenResty Edge Log Server Database.
Additionally, we have implemented an interactive configuration tool. You can refer to High-Availability Database Cluster Management Tool for OpenResty Edge.
Backup Database
If you have previously installed OpenResty Edge Admin Database or OpenResty Edge Log Server Database, we strongly recommend that you refer to this document to make a backup first to avoid data loss.
Environment Preparation
Before starting the configuration, make sure of the following:
- At least three servers are available: one for the Monitor node, one for the primary database node, and one for the secondary database node.
- The master node can be a previously installed instance of OpenResty Edge Admin Database or OpenResty Edge Log Server Database.
- The firewall on all nodes allows communication on port 5432.
- If you need to add more secondary nodes, you can repeat the configuration steps for the secondary nodes.
Configuration Steps
1. Configure the Monitor Node
Note: The Monitor node must be configured and installed on a new machine; execution on a machine containing a database will result in data loss.
On the new Monitor machine, initialize the monitor database environment.
Use the installer to install OpenResty Edge Admin Database or OpenResty Edge Log Server Database to initialize the environment.
Stop and disable the existing database service:
sudo systemctl stop openresty-postgresql12
sudo systemctl disable openresty-postgresql12
Configure the Monitor node:
sudo su - postgres bash -c 'env PATH="/usr/local/openresty-postgresql12/bin:$PATH" pg_autoctl create monitor \ --pgdata=/var/postgres12/monitor \ --pgport 5432 \ --hostname <MONITOR_IP> \ --auth trust \ --ssl-self-signed \ --run'<MONITOR_IP>: Please fill in the IP address of the Monitor server.
If it runs normally without errors, press CTRL+C to close the current service.
Update the systemd service file and start the Monitor service:
sudo bash -c 'env PATH="/usr/local/openresty-postgresql12/bin:$PATH" pg_autoctl show systemd \
   --pgdata /var/postgres12/monitor' | sudo tee /etc/systemd/system/openresty-postgresql12-monitor.service

sudo systemctl daemon-reload
sudo systemctl enable openresty-postgresql12-monitor
sudo systemctl start openresty-postgresql12-monitor
Check the Monitor service status:
sudo systemctl status openresty-postgresql12-monitor
2. Configure the Primary Database Node
Configure the primary database node on the primary machine.
The primary database node can be a previously installed OpenResty Edge Admin Database or OpenResty Edge Log Server Database instance. You can continue to use this instance or do a fresh install using the installer.
Note: If you do a fresh install here, the previous data will be lost, so please be careful to back up your data.
Stop and disable the existing database service:
sudo systemctl stop openresty-postgresql12
sudo systemctl disable openresty-postgresql12
Configure the primary database node.
sudo su - postgres bash -c 'env PATH="/usr/local/openresty-postgresql12/bin:$PATH" pg_autoctl create postgres \ --pgdata /var/postgres12/data \ --hostname <DATABASE_NODE1_IP> \ --auth trust \ --ssl-self-signed \ --monitor "postgres://autoctl_node@<MONITOR_IP>:5432/pg_auto_failover?sslmode=require" \ --run'<MONITOR_IP>: Use the IP of the previously configured Monitor node.<DATABASE_NODE1_IP>: Fill in the IP address of the current server.
If it runs normally without errors, press
CTRL+Cto close the current service.After shutting down the service with
CTRL+C, if there arepg_hbarelated error messages in the logs, such as:ERROR Connection to database failed: FATAL: no pg_hba.conf entry for host "xx.xx.xx.xx", user "autoctl_node", database "pg_auto_failover", SSL onfollow the log prompts to the Monitor server and open the
/var/postgres12/monitor/pg_hba.conffile and add a new source IP address, for example:hostssl "pg_auto_failover" "autoctl_node" <SOURCE_IP>/32 trust<SOURCE_IP: SOURCE_IP is the IP mentioned in the error log, please fill in according to your error log prompts.
Save the file and restart the monitor service:
sudo systemctl restart openresty-postgresql12-monitorThen retry the configuration operation again.
Update the systemd service file and start the primary node service:
sudo bash -c 'env PATH="/usr/local/openresty-postgresql12/bin:$PATH" pg_autoctl show systemd \
   --pgdata /var/postgres12/data' | sudo tee /etc/systemd/system/openresty-postgresql12-node.service

sudo systemctl daemon-reload
sudo systemctl enable openresty-postgresql12-node
sudo systemctl start openresty-postgresql12-node
Check the primary node service status:
sudo systemctl status openresty-postgresql12-node
3. Configure the Secondary Database Node
Note: The secondary database node must be configured and installed on a new machine; execution on a machine containing a database will result in data loss.
Repeat the following steps if you need to add more secondary nodes.
On the new secondary machine, initialize the database environment.
Use the installer to install OpenResty Edge Admin Database or OpenResty Edge Log Server Database to initialize the environment.
Stop and disable the existing database service:
sudo systemctl stop openresty-postgresql12
sudo systemctl disable openresty-postgresql12

sudo rm -rf /var/postgres12/data
Configure the secondary node:
sudo su - postgres bash -c 'env PATH="/usr/local/openresty-postgresql12/bin:$PATH" pg_autoctl create postgres \ --pgdata /var/postgres12/data \ --hostname <DATABASE_NODE2_IP> \ --auth trust \ --ssl-self-signed \ --monitor "postgres://autoctl_node@<MONITOR_IP>:5432/pg_auto_failover?sslmode=require" \ --run'<MONITOR_IP>: Use the IP of the previously configured Monitor node.<DATABASE_NODE2_IP>: Fill in the IP address of the current server.
If it runs normally without errors, press
CTRL+Cto close the current service.After shutting down the service with
CTRL+C, if there arepg_hbarelated error messages in the logs, such as:ERROR Connection to database failed: FATAL: no pg_hba.conf entry for host "xx.xx.xx.xx", user "autoctl_node", database "pg_auto_failover", SSL onfollow the log prompts to the Monitor server and open the
/var/postgres12/monitor/pg_hba.conffile and add a new source IP address, for example:hostssl "pg_auto_failover" "autoctl_node" <SOURCE_IP>/32 trust<SOURCE_IP: SOURCE_IP is the IP mentioned in the error log, please fill in according to your error log prompts.
Save the file and restart the monitor service:
sudo systemctl restart openresty-postgresql12-monitorThen retry the configuration operation again.
Update the systemd service file and start the secondary node service:
sudo bash -c 'env PATH="/usr/local/openresty-postgresql12/bin:$PATH" pg_autoctl show systemd \
   --pgdata /var/postgres12/data' | sudo tee /etc/systemd/system/openresty-postgresql12-node.service

sudo systemctl daemon-reload
sudo systemctl enable openresty-postgresql12-node
sudo systemctl start openresty-postgresql12-node
Check the secondary node service status:
sudo systemctl status openresty-postgresql12-node
4. Check Cluster Status
Execute the following command on the Monitor machine to check the cluster status:
sudo su - postgres bash -c 'env PATH="/usr/local/openresty-postgresql12/bin:$PATH" pg_autoctl show state \
    --pgdata /var/postgres12/monitor'
Under normal circumstances, the output should look similar to:
   Name |  Node |           Host:Port |        TLI: LSN |   Connection |      Reported State |      Assigned State
--------+-------+---------------------+-----------------+--------------+---------------------+--------------------
 node_1 |     1 | <DATABASE_NODE1_IP>:5432   |   1: 0/140091B8 |   read-write |             primary |             primary
 node_2 |     2 | <DATABASE_NODE2_IP>:5432 |   1: 0/140091B8 |    read-only |           secondary |           secondary
5. Modify the configuration file to allow the service to connect to the database cluster
Please choose to modify either the OpenResty Admin or OpenResty Log Server configuration file based on your currently configured database cluster type.
Modifying OpenResty Admin Configuration File
Log in to the machine where OpenResty Admin is located.
Open the configuration file: Configuration file path:
/usr/local/oredge-admin/conf/config.iniAdd or modify the following configuration in the
[postgresql]section:[postgresql] endpoints="postgresql://[PRIMARY_IP]:5432,[SECONDARY_IP]:5432/or_edge_admin?user=or_edge_admin&password=[PASSWORD]&pool_size=10"Note: Replace
[PRIMARY_IP],[SECONDARY_IP], and[PASSWORD]with actual values. If the cluster has multiple IPs, you can continue adding them after[SECONDARY_IP], separated by commas.Get the PASSWORD:
sudo cat /usr/local/oredge-admin/conf/or-config.ini | grep passwordSave the changes and exit the editor.
Restart the oredge-admin service:
sudo systemctl start upgrade-oredge-adminObserve the error log:
sudo tail -f /usr/local/oredge-admin/logs/error.logIf you see any errors, troubleshoot accordingly based on the error messages.
Modifying OpenResty Log Server Configuration File
Log in to the machine where OpenResty Log Server is located.
Open the configuration file: Configuration file path:
/usr/local/oredge-log-server/conf/config.iniAdd or modify the following configuration in the
[postgresql]section:[postgresql] endpoints="postgresql://[PRIMARY_IP]:5432,[SECONDARY_IP]:5432/or_edge_log_server?user=or_edge_log_server&password=[PASSWORD]&pool_size=10"Note: Replace
[PRIMARY_IP],[SECONDARY_IP], and[PASSWORD]with actual values. If the cluster has multiple IPs, you can continue adding them after[SECONDARY_IP], separated by commas.Get the PASSWORD:
sudo cat /usr/local/oredge-log-server/conf/or-config.ini | grep passwordSave the changes and exit the editor.
Restart the oredge-log-server service:
sudo systemctl start upgrade-oredge-log-serverObserve the error log:
sudo tail -f /usr/local/oredge-log-server/logs/error.logIf you see any errors, troubleshoot accordingly based on the error messages.
For more configuration details, please refer to the official documentation.
With this, the database cluster service configuration is complete!
Failover and Recovery
Automatic Failover: When the primary database becomes unavailable, the secondary will automatically be promoted to primary. If there are only two nodes, the status will show as wait_primary:
   Name |  Node |           Host:Port |        TLI: LSN |   Connection |      Reported State |      Assigned State
--------+-------+---------------------+-----------------+--------------+---------------------+--------------------
 node_1 |     1 | <DATABASE_NODE1_IP>:5432   |   1: 0/140092D8 | read-write ! |             primary |             demoted
 node_2 |     2 | <DATABASE_NODE2_IP>:5432 |   2: 0/14009FF8 |   read-write |        wait_primary |        wait_primary
Automatic Recovery: When the original primary recovers, it will automatically join the cluster as a secondary:
   Name |  Node |           Host:Port |        TLI: LSN |   Connection |      Reported State |      Assigned State
--------+-------+---------------------+-----------------+--------------+---------------------+--------------------
 node_1 |     1 | <DATABASE_NODE1_IP>:5432   |   2: 0/1405E208 |    read-only |           secondary |           secondary
 node_2 |     2 | <DATABASE_NODE2_IP>:5432 |   2: 0/1405E208 |   read-write |             primary |             primary
Note:
- Repeat the secondary configuration steps if you need to add more secondary nodes.
- Ensure that the system time on all nodes is synchronized to avoid potential replication issues.
- Regularly backup the database to ensure data safety.
- Monitor the cluster status and address potential issues promptly.