OpenResty XRay™ On-Premise Deployment on Azure Kubernetes Service
Overview
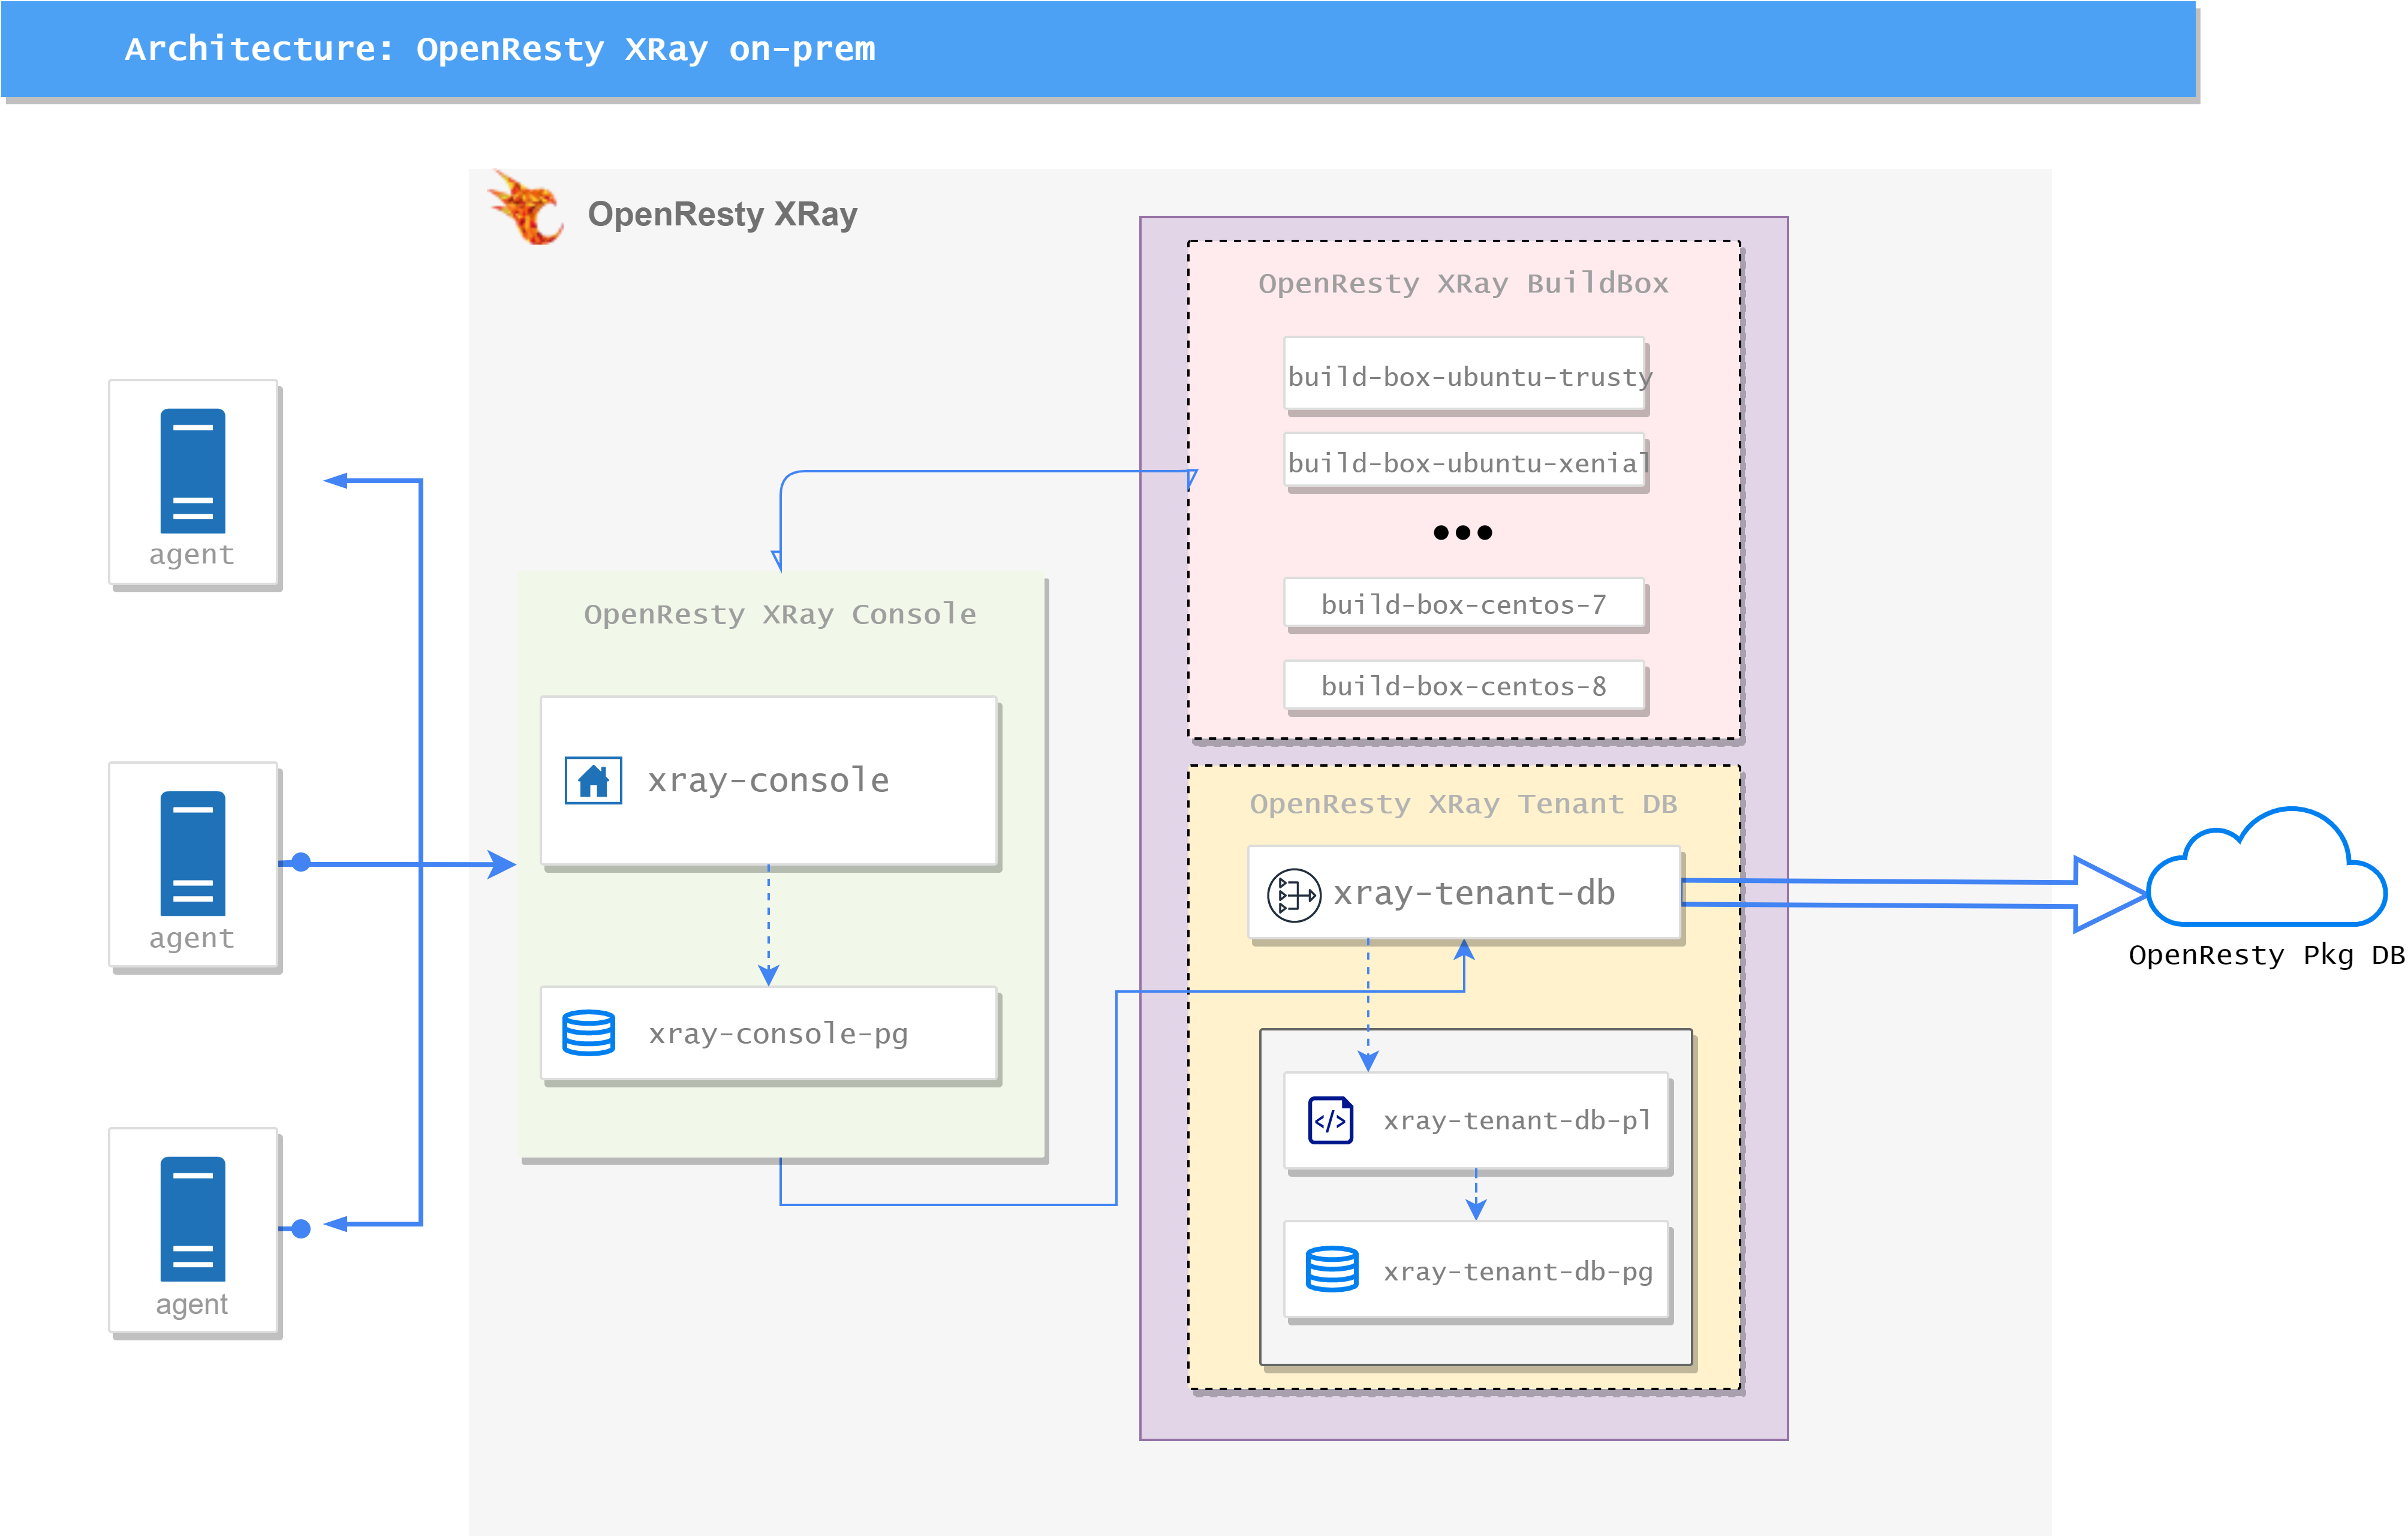
OpenResty XRay’s architecture adopts a distributed deployment model. The console service runs in Docker containers managed by Kubernetes, while the Agent is deployed on target machines, enabling flexible monitoring and management.
The XRay server-side architecture mainly consists of two Pods, each containing multiple sub-services:
OpenResty XRay ConsolePod:- xray-console: Provides XRay’s web management interface, the main entry point for user interaction
- xray-console-pg: Serves as the database backend for the web service, storing console-related data
OpenResty XRay BuildBoxPod:- build-box-[dist]: Responsible for building XRay tools, where
distrepresents the corresponding operating system distribution - xray-tenant-db: Provides query interfaces for
xray-consoleandbuild-box-[dist]services, following the ‘private library -> public library’ query order. Note: This service only initiates queries to the public library and does not upload data to the public library - xray-tenant-db-pg: Serves as the backend storage for the customer’s private software database
- build-box-[dist]: Responsible for building XRay tools, where
In the following deployment example, we will use Azure Disk as the data volume persistence solution to ensure data reliability and durability.
Creating a Kubernetes Cluster
Before installing OpenResty XRay, if you haven’t created a Kubernetes cluster on Azure, you need to create one first. You can refer to our video tutorial (https://www.youtube.com/watch?v=-asOidukUw8) for detailed steps on creating a Kubernetes cluster on Azure.
After creating the cluster, please configure the following environment variables, which will be used in subsequent steps:
export AZ_SUBSCRIPTION_ID=<AZ_SUBSCRIPTION_ID>
export AKS_CLUSTER_RESOURCE_GROUP=AKS
export AKS_NAME=xray-console
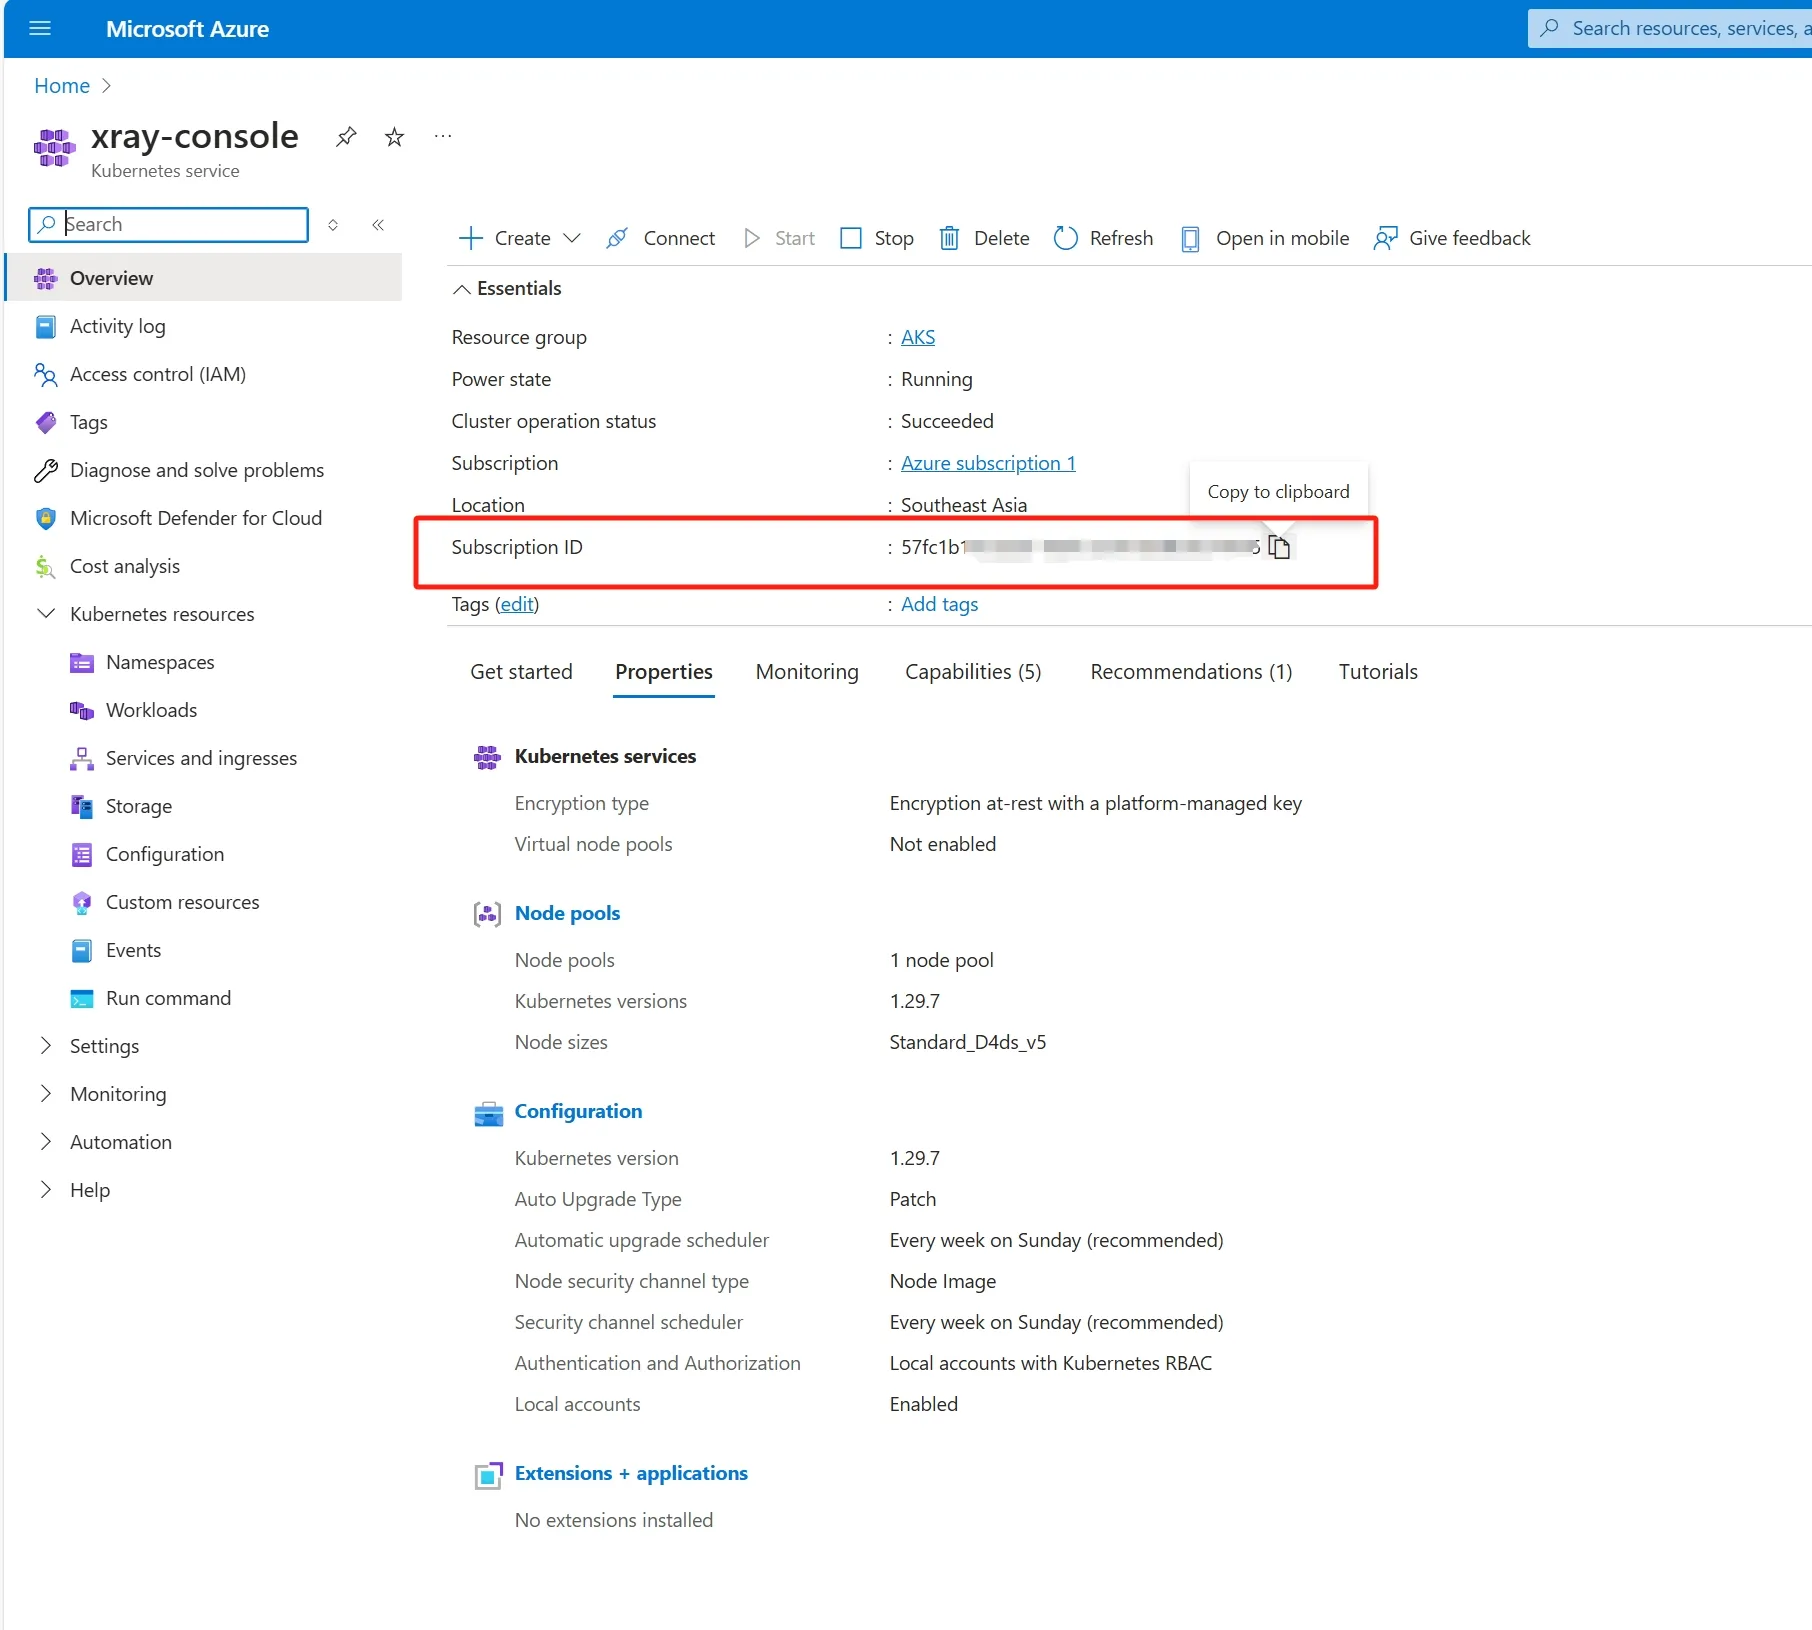
Note: Please copy the
AZ_SUBSCRIPTION_IDfrom the Subscription ID field on the Kubernetes cluster page.
Next, install the Azure command-line tool az, and execute the following command to log in to your Azure account:
az login --use-device-code
Execute the following command to configure kubectl on your local machine to connect to the Kubernetes cluster on Azure:
az aks get-credentials --resource-group $AKS_CLUSTER_RESOURCE_GROUP --name $AKS_NAME
After completing these steps, you can start installing OpenResty XRay.
Installing OpenResty XRay Console Service
1. Hardware Requirements
To ensure smooth operation of OpenResty XRay, please meet the following hardware requirements:
- Basic Kubernetes platform
- Storage configuration:
xray-consolepod: 500Gi hard diskxray-console-pgpod: 1Ti hard diskbuild-boxcontainer intenant-dbpod: 100Gi hard disktenant-dbcontainer intenant-dbpod: 50Gi hard disktenant-db-pgcontainer intenant-dbpod: 50Gi hard disk
- Memory requirement: At least 1GB memory allocated for each container
Note:
- Hard disk usage reference: Based on experience, the 30-day cycle sampling data growth for a single Agent is approximately 10GB
2. Configuring Image Repository Access Credentials
To ensure the Kubernetes cluster can access the OpenResty image repository, please follow these steps to create the necessary namespace and Secret:
- Create a dedicated namespace:
kubectl create ns openresty-xray
- Create a Docker repository Secret using the credentials provided in the email:
kubectl create secret docker-registry openresty-xray \
  --docker-server=registry.openresty.com \
  --docker-username=<docker-registry username> \
  --docker-password=<docker-registry password> \
  -n openresty-xray
Make sure to replace <docker-registry username> and <docker-registry password> with the actual username and password.
3. Creating Console Certificate Secret (Optional)
If you need to use a custom certificate, you need to perform this step. If skipped, the console will use the built-in self-signed certificate.
Place the certificate for the XRay server’s corresponding domain in the cert directory:
$ ls cert/
ssl.crt  ssl.key
Use the following command to create the secret:
kubectl create secret generic cert-secret --from-file=cert -n openresty-xray
Find the following lines in the aks-kubernetes.yml file and uncomment them to use the custom certificate:
#- mountPath: /usr/local/orxray-console/conf/cert
#  name: cert
#  readOnly: true
...
volumes:
#- name: cert
#  secret:
#    secretName: cert-secret
The environment variable in the aks-kubernetes.yml file needs to be consistent with the domain name in the certificate:
        - name: CONSOLE_HOST
          value: xxx.xx.com
4. Using Azure Disk as Data Volume Persistence Solution
When deploying the server-side, we need to provide persistent data storage for certain components. This section will introduce how to use Azure Disk to achieve this goal.
4.1 Creating Azure Disks
First, we need to create several Azure Disks to store data for different components. Here are the steps for the creation process:
Set environment variables
Before starting, please ensure you set the following environment variables. If you’ve already configured them in previous sections, you can skip this step.
export AZ_SUBSCRIPTION_ID=<AZ_SUBSCRIPTION_ID>
export AKS_CLUSTER_RESOURCE_GROUP=AKS
export AKS_NAME=xray-console
Configure disk sizes
Set the required disk sizes for each component (in GB):
export ORXRAY_CONSOLE_DISK_SIZE=500
export ORXRAY_CONSOLE_PG_DISK_SIZE=1024
export ORXRAY_BUILDBOX_DISK_SIZE=100
export ORXRAY_TENANT_DB_DISK_SIZE=50
export ORXRAY_TENANT_DB_PG_DISK_SIZE=50
Note: These are recommended disk sizes, you can adjust them based on your actual needs.
Get AKS node resource group
Execute the following command to get the name of the AKS node resource group:
AKS_NODE_RESOURCE_GROUP=$(az aks show \
    --resource-group $AKS_CLUSTER_RESOURCE_GROUP \
    --name $AKS_NAME --query nodeResourceGroup -o tsv)
Create Azure Disks
Use the following commands to create corresponding Azure Disks for each component:
# Create console disk
az disk create \
  --resource-group $AKS_NODE_RESOURCE_GROUP \
  --name orxray_console_disk \
  --size-gb $ORXRAY_CONSOLE_DISK_SIZE \
  --query id --output tsv

# Create console-pg disk
az disk create \
  --resource-group $AKS_NODE_RESOURCE_GROUP \
  --name orxray_console_pg_disk \
  --size-gb $ORXRAY_CONSOLE_PG_DISK_SIZE \
  --query id --output tsv

# Create build-box disk
az disk create \
  --resource-group $AKS_NODE_RESOURCE_GROUP \
  --name orxray_buildbox_disk \
  --size-gb $ORXRAY_BUILDBOX_DISK_SIZE \
  --query id --output tsv

# Create tenant-db disk
az disk create \
  --resource-group $AKS_NODE_RESOURCE_GROUP \
  --name orxray_tenant_db_disk \
  --size-gb $ORXRAY_TENANT_DB_DISK_SIZE \
  --query id --output tsv

# Create tenant-db-pg disk
az disk create \
  --resource-group $AKS_NODE_RESOURCE_GROUP \
  --name orxray_tenant_db_pg_disk \
  --size-gb $ORXRAY_TENANT_DB_PG_DISK_SIZE \
  --query id --output tsv
Through these steps, we have successfully created the required Azure Disks, providing a persistent storage solution for each component.
Note: For more information about Azure Disk and AKS, please refer to the following official documentation:
4.2 Using the aks-kubernetes-pv.yml.sample file from the email attachment
You need to replace SUBSCRIPTION_ID and AKS_NODE_RESOURCE_GROUP with the current values being used. You can also modify the size of the corresponding persistent volumes based on the size of the created disks.
sed -i "s/<SUBSCRIPTION_ID>/$AZ_SUBSCRIPTION_ID/g" aks-kubernetes-pv.yml.sample
sed -i "s/<AKS_NODE_RESOURCE_GROUP>/$AKS_NODE_RESOURCE_GROUP/g" aks-kubernetes-pv.yml.sample
kubectl apply -f aks-kubernetes-pv.yml.sample
5. Deploying the Server-side to Kubernetes
After completing the aforementioned preparations, we can start deploying the server-side to the Kubernetes cluster. This process is straightforward:
Prepare the deployment file Use the
aks-kubernetes.ymlfile provided in the email attachment. This file contains all necessary Kubernetes resource definitions.Execute the deployment command Run the following command in the command line:
kubectl apply -f aks-kubernetes.ymlThis command will create or update the corresponding resources in the Kubernetes cluster according to the configuration in the YAML file.
Verify the deployment After deployment, you can use commands like
kubectl get podsto check the running status of each component, ensuring all Pods have started successfully.$ kubectl get pods -n openresty-xray NAME READY STATUS RESTARTS AGE xray-console-9d4b7d8c9-wb855 2/2 Running 0 22m xray-tenant-db-886cfd856-gtpbc 10/10 Running 0 22m
6. Accessing the Service
After deployment, we need to expose the xray-console service through Ingress. Here are the configuration steps and considerations:
6.1 Configuring Ingress
We need to use Ingress to expose port 443 of the xray-console service. For detailed configuration guidelines, you can refer to the Azure official documentation: Use Application Routing in AKS.
Here’s also an Ingress configuration example for verification:
Note: This configuration is for testing purposes only. It’s not recommended to use HTTP in production environments.
apiVersion: networking.k8s.io/v1
kind: Ingress
metadata:
name: xray-ingress
namespace: openresty-xray
spec:
ingressClassName: webapprouting.kubernetes.azure.com
defaultBackend:
service:
name: xray-console
port:
number: 80
6.2 Applying Ingress Configuration
Save the above configuration as
ingress.ymlfile.Execute the following command to apply the configuration:
kubectl apply -f ingress.ymlVerify Ingress status:
kubectl get ingress -n openresty-xrayYou will see output similar to the following:
NAME CLASS HOSTS ADDRESS PORTS AGE xray-ingress webapprouting.kubernetes.azure.com * xx.xx.xx.xx 80 161m
6.3 Accessing the Service
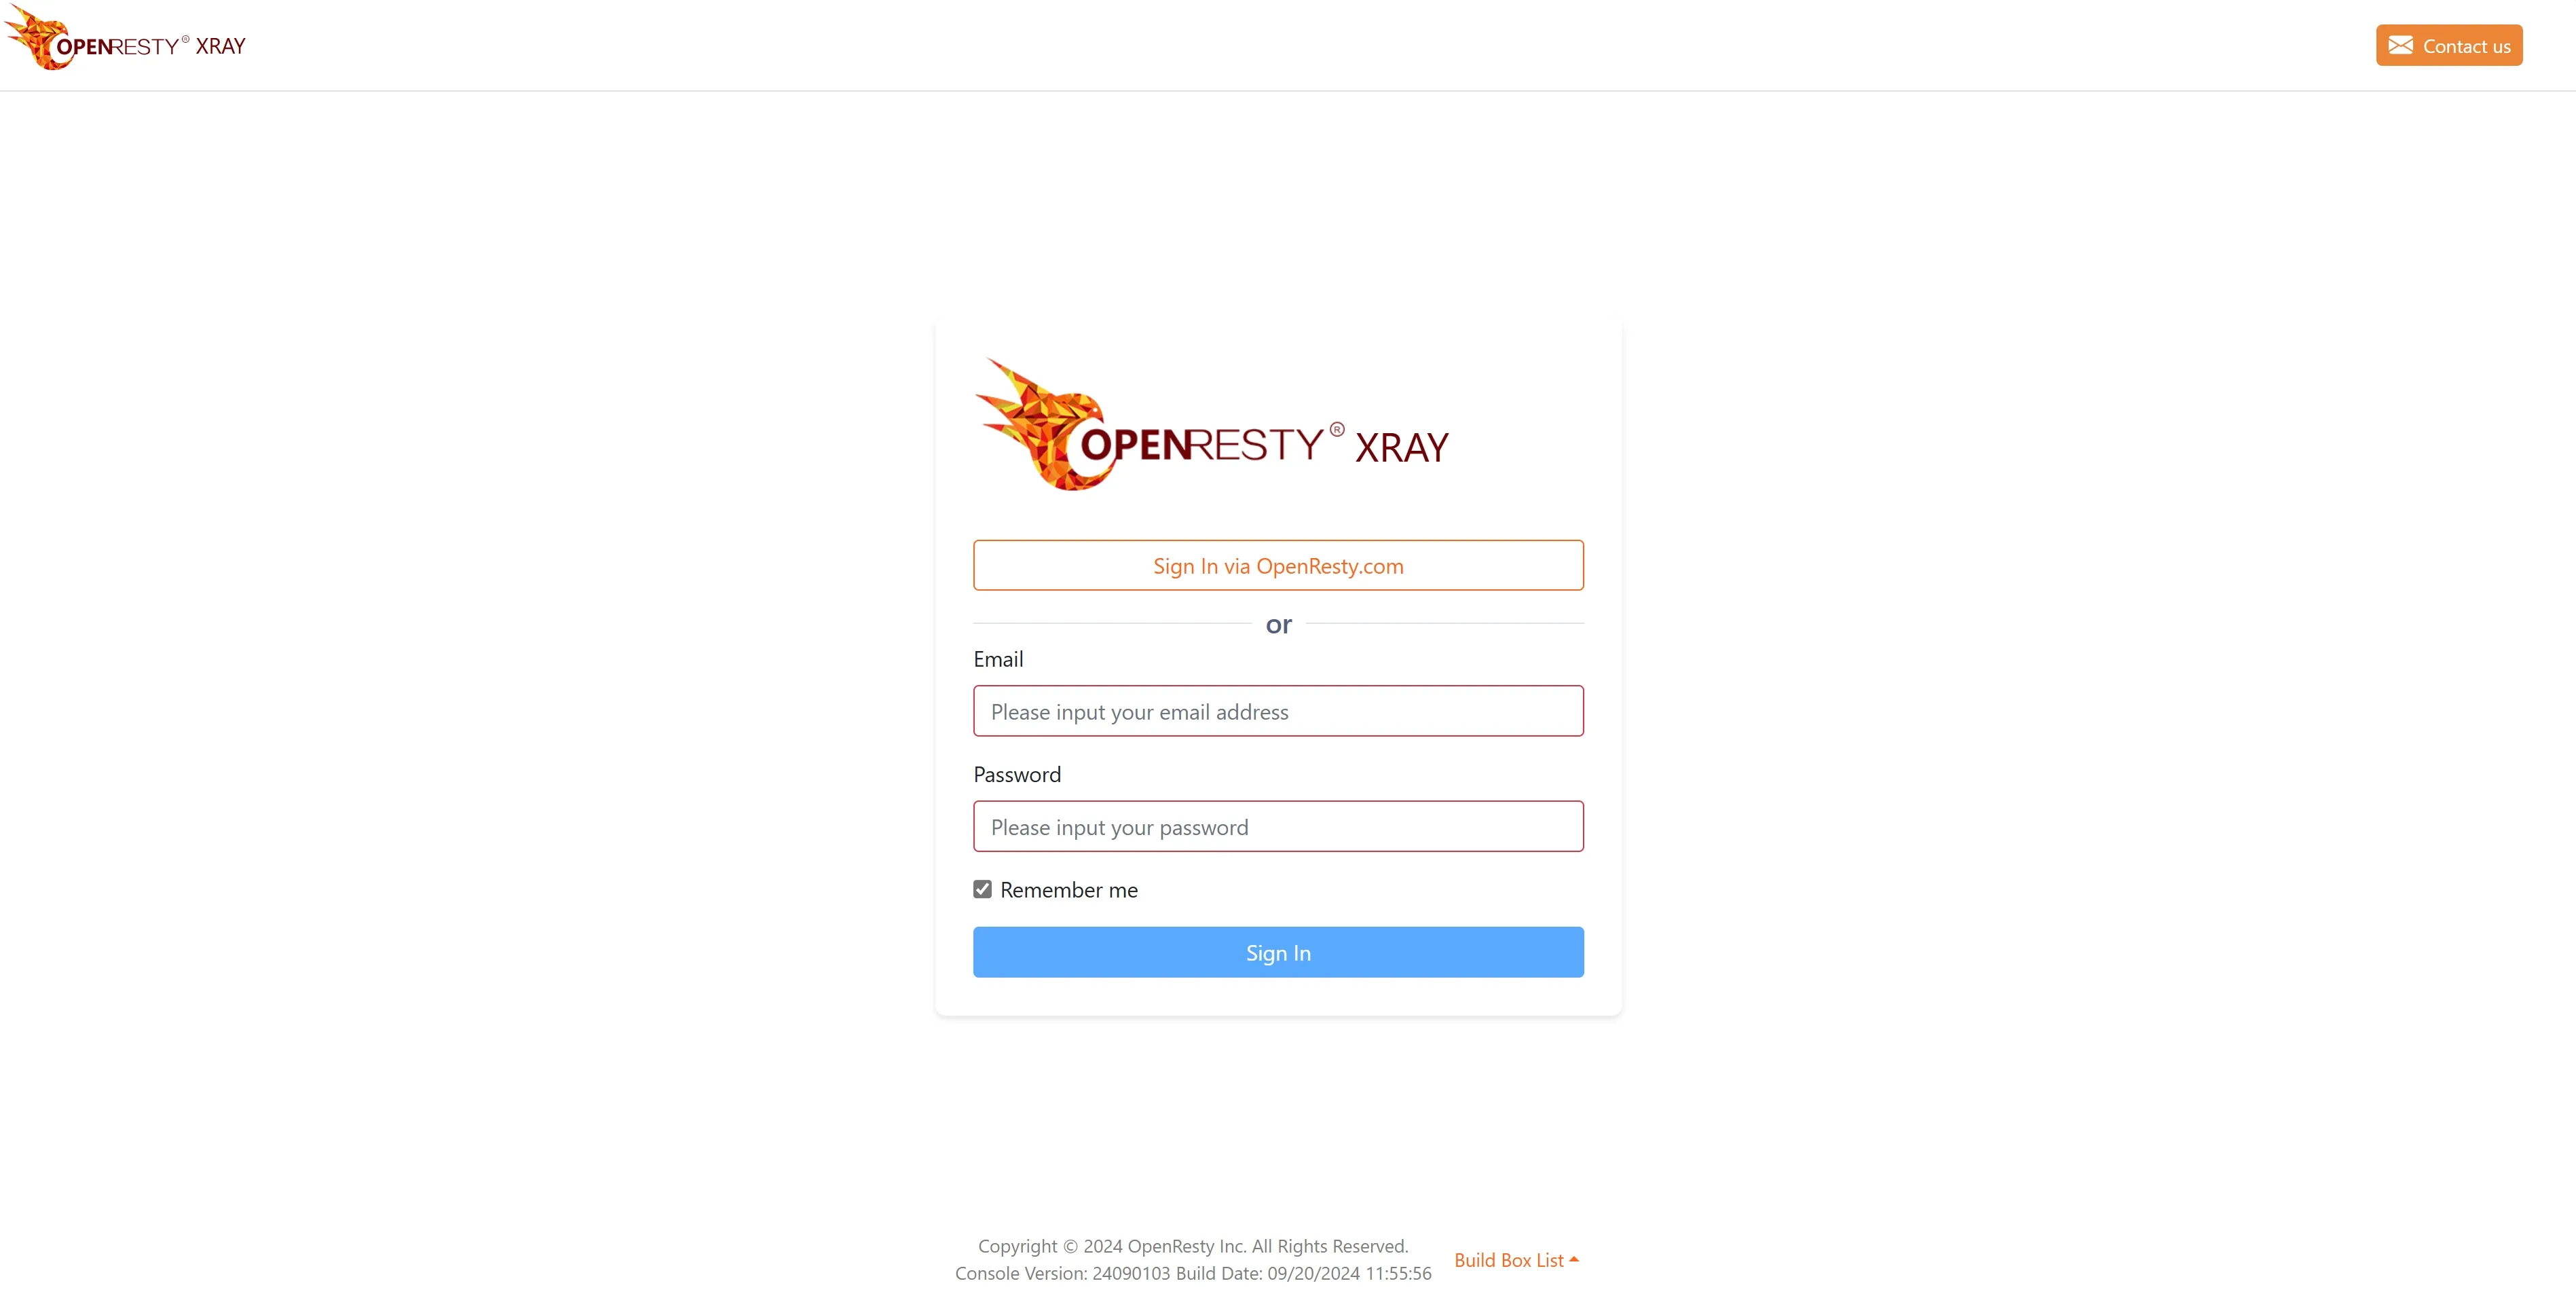
Use the IP address in the ADDRESS field of Ingress to access the service http://xx.xx.xx.xx.
If you see the following login interface, it indicates that the service has been successfully deployed:
Notes:
- In production environments, it’s strongly recommended to configure HTTPS to ensure communication security.
- Consider setting up a domain name and configuring corresponding DNS records for more convenient access to the service.
By following these steps, you should be able to successfully access the deployed xray-console service. If you encounter any issues, please check the Ingress configuration and network settings, or refer to relevant documentation for troubleshooting.
Installing OpenResty XRay Agent Service
The XRay Agent runs on the target machine. After installation, the Agent communicates with the self-deployed console service, and the Agent installation is also completed with the help of the console service:
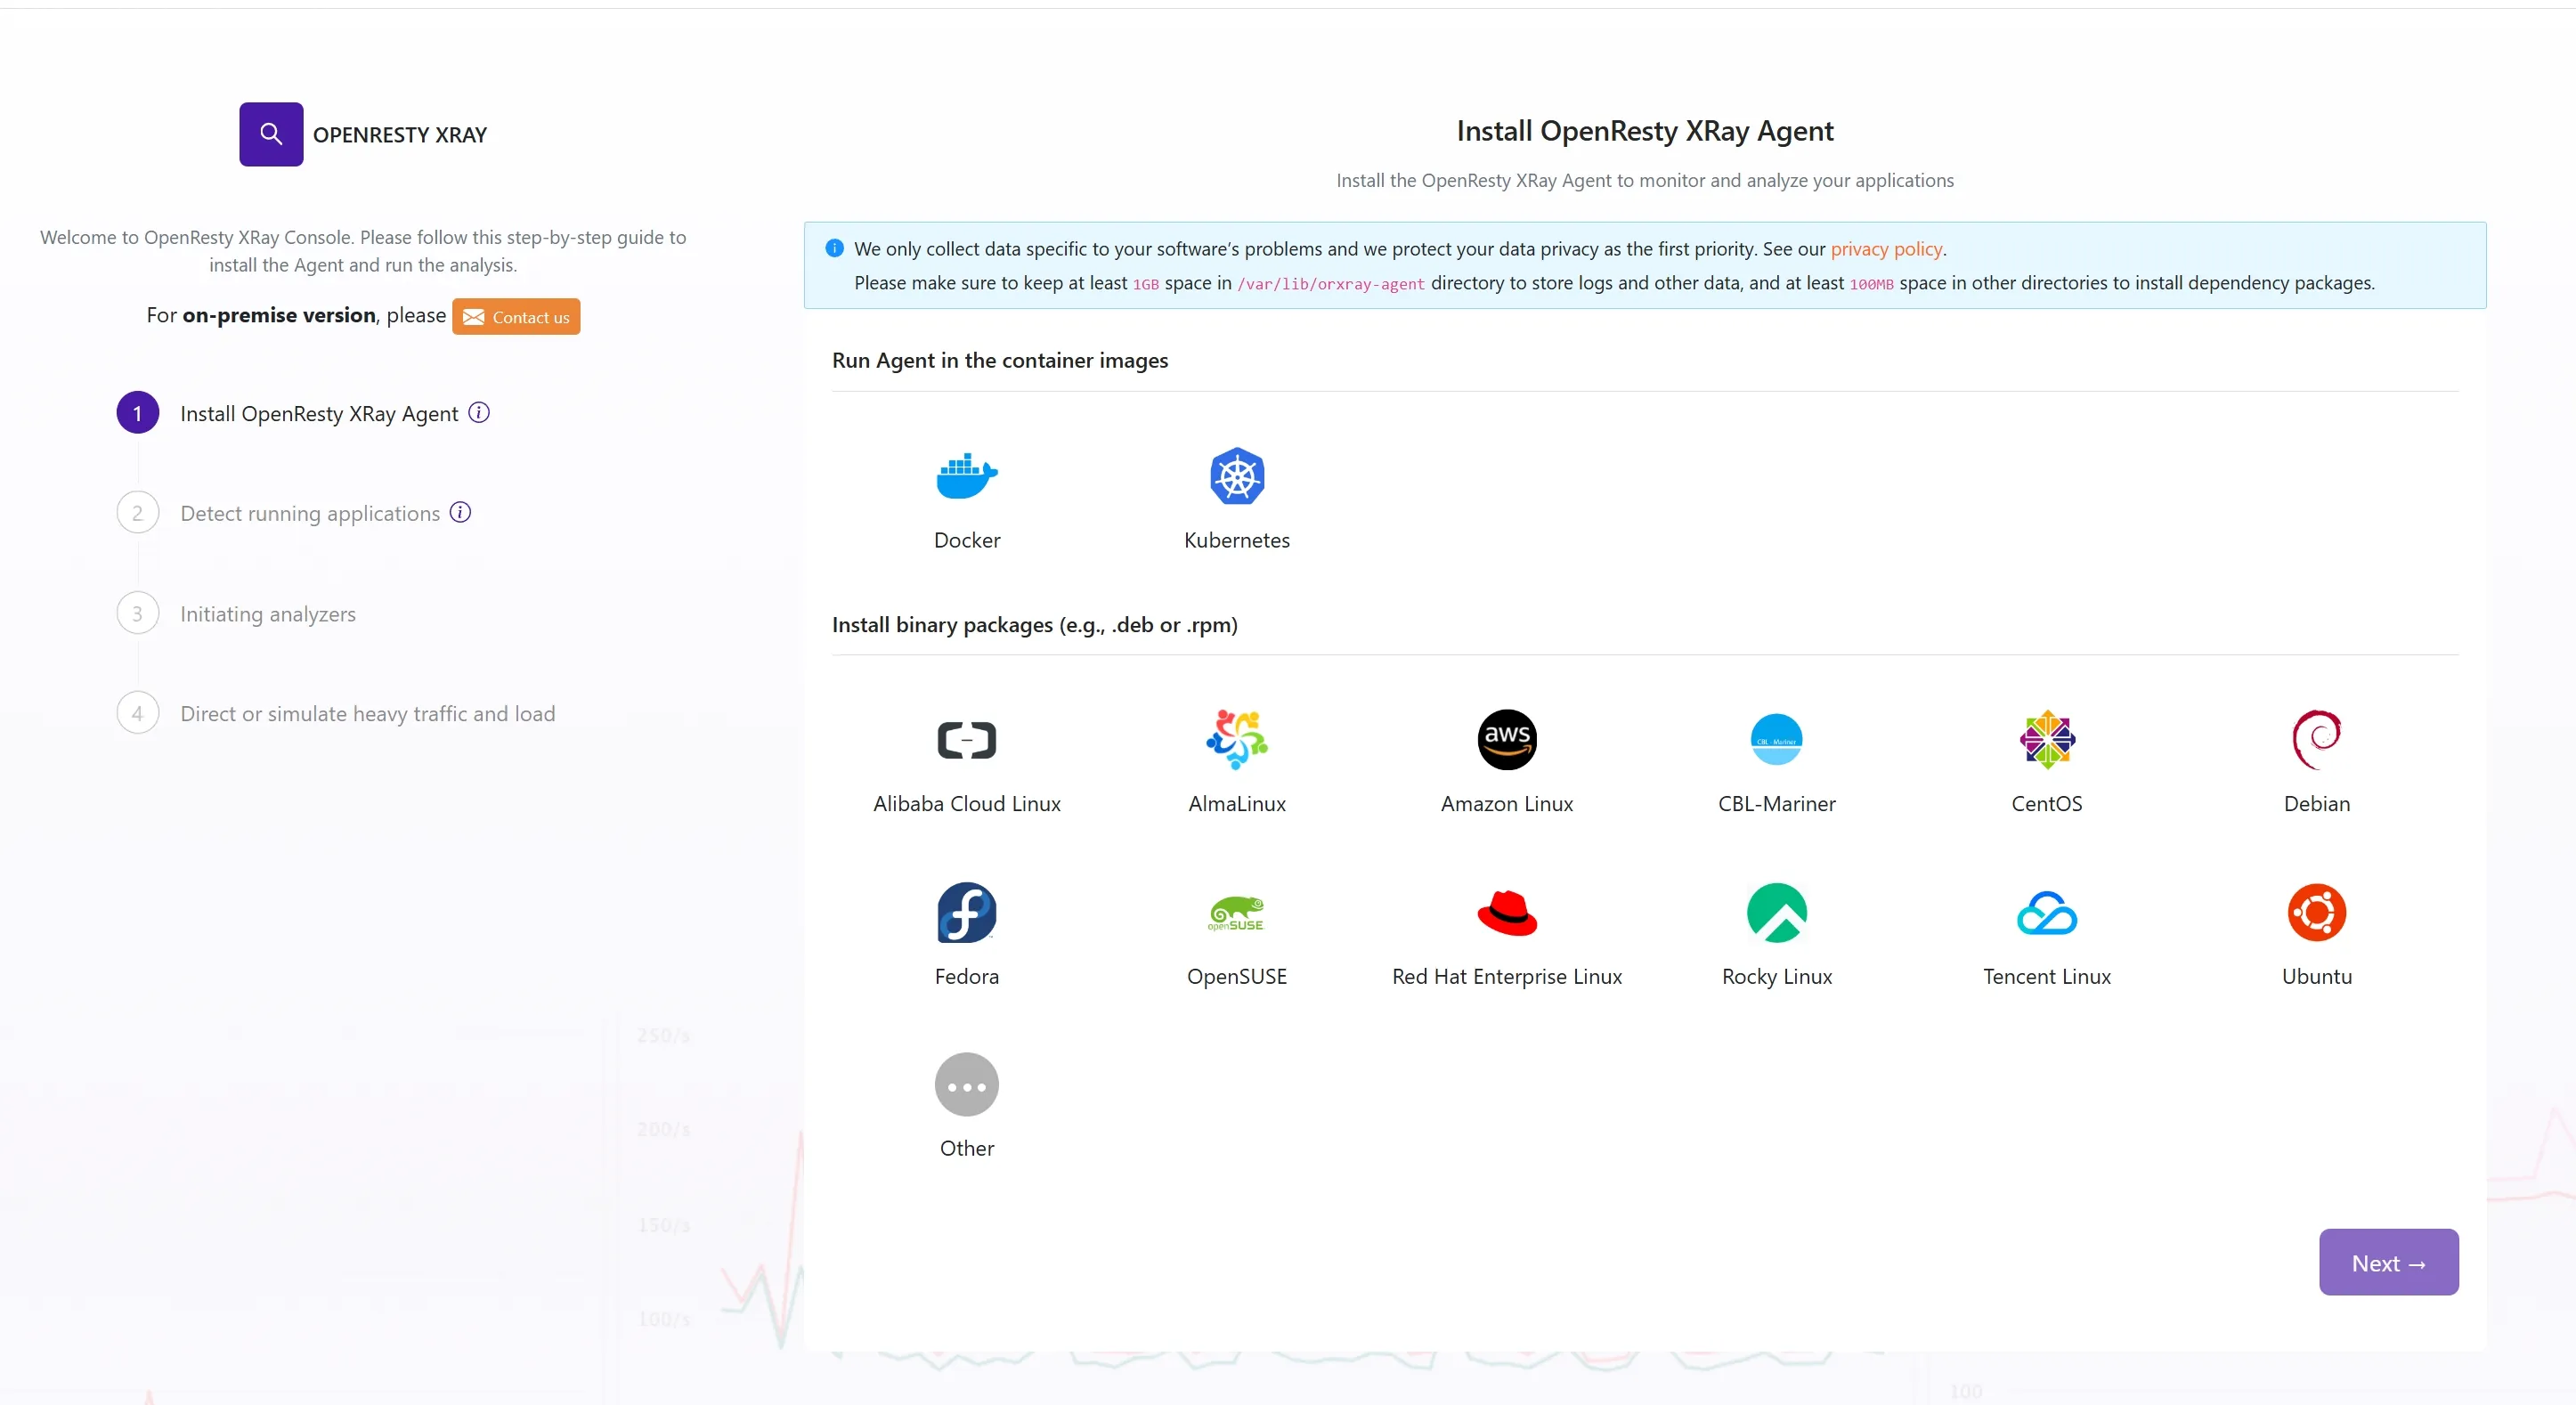
Access the console service backend in your browser, and use the username and password provided in the email to log in. After logging in, you will see the installation wizard and supported operating systems. Follow the prompts in the installation wizard to install the Agent.
After installing the Agent, you can modify the password and add new users in the User tab on the left side.
Daily Operations
Viewing Service POD Status
$ kubectl get pods -n openresty-xray

NAME                             READY   STATUS    RESTARTS   AGE
xray-console-9d4b7d8c9-wb855     2/2     Running   0          22m
xray-tenant-db-886cfd856-gtpbc   10/10   Running   0          22m
Viewing Console Service Logs
kubectl logs --tail=10 -n openresty-xray -l app=xray-console -c xray-console
Checking Service Status
kubectl describe pod xray-console-5d457bb49d-q49f8 -n openresty-xray
Service Upgrade
First, stop the old Pods, then start the new Pods. Wait until the new Pods start successfully, and the upgrade is complete.
The aks-kubernetes-pods.yml file is provided in the attachment of the upgrade email.
kubectl delete -f aks-kubernetes-pods.yml
kubectl apply -f aks-kubernetes-pods.yml
During the upgrade, there is no need to delete the old PVCs and their corresponding PVs. Because the PV has the RWO (Read-Write-Once) attribute, if the PVC is deleted, the corresponding PV also needs to be deleted and then recreated (this will not affect the already persisted data).