OpenResty XRay™ On-Premise Version (docker-compose)
Name
OpenResty XRay On-Premise Docker-Compose Version Installation and Deployment Guide
Contents
Overview
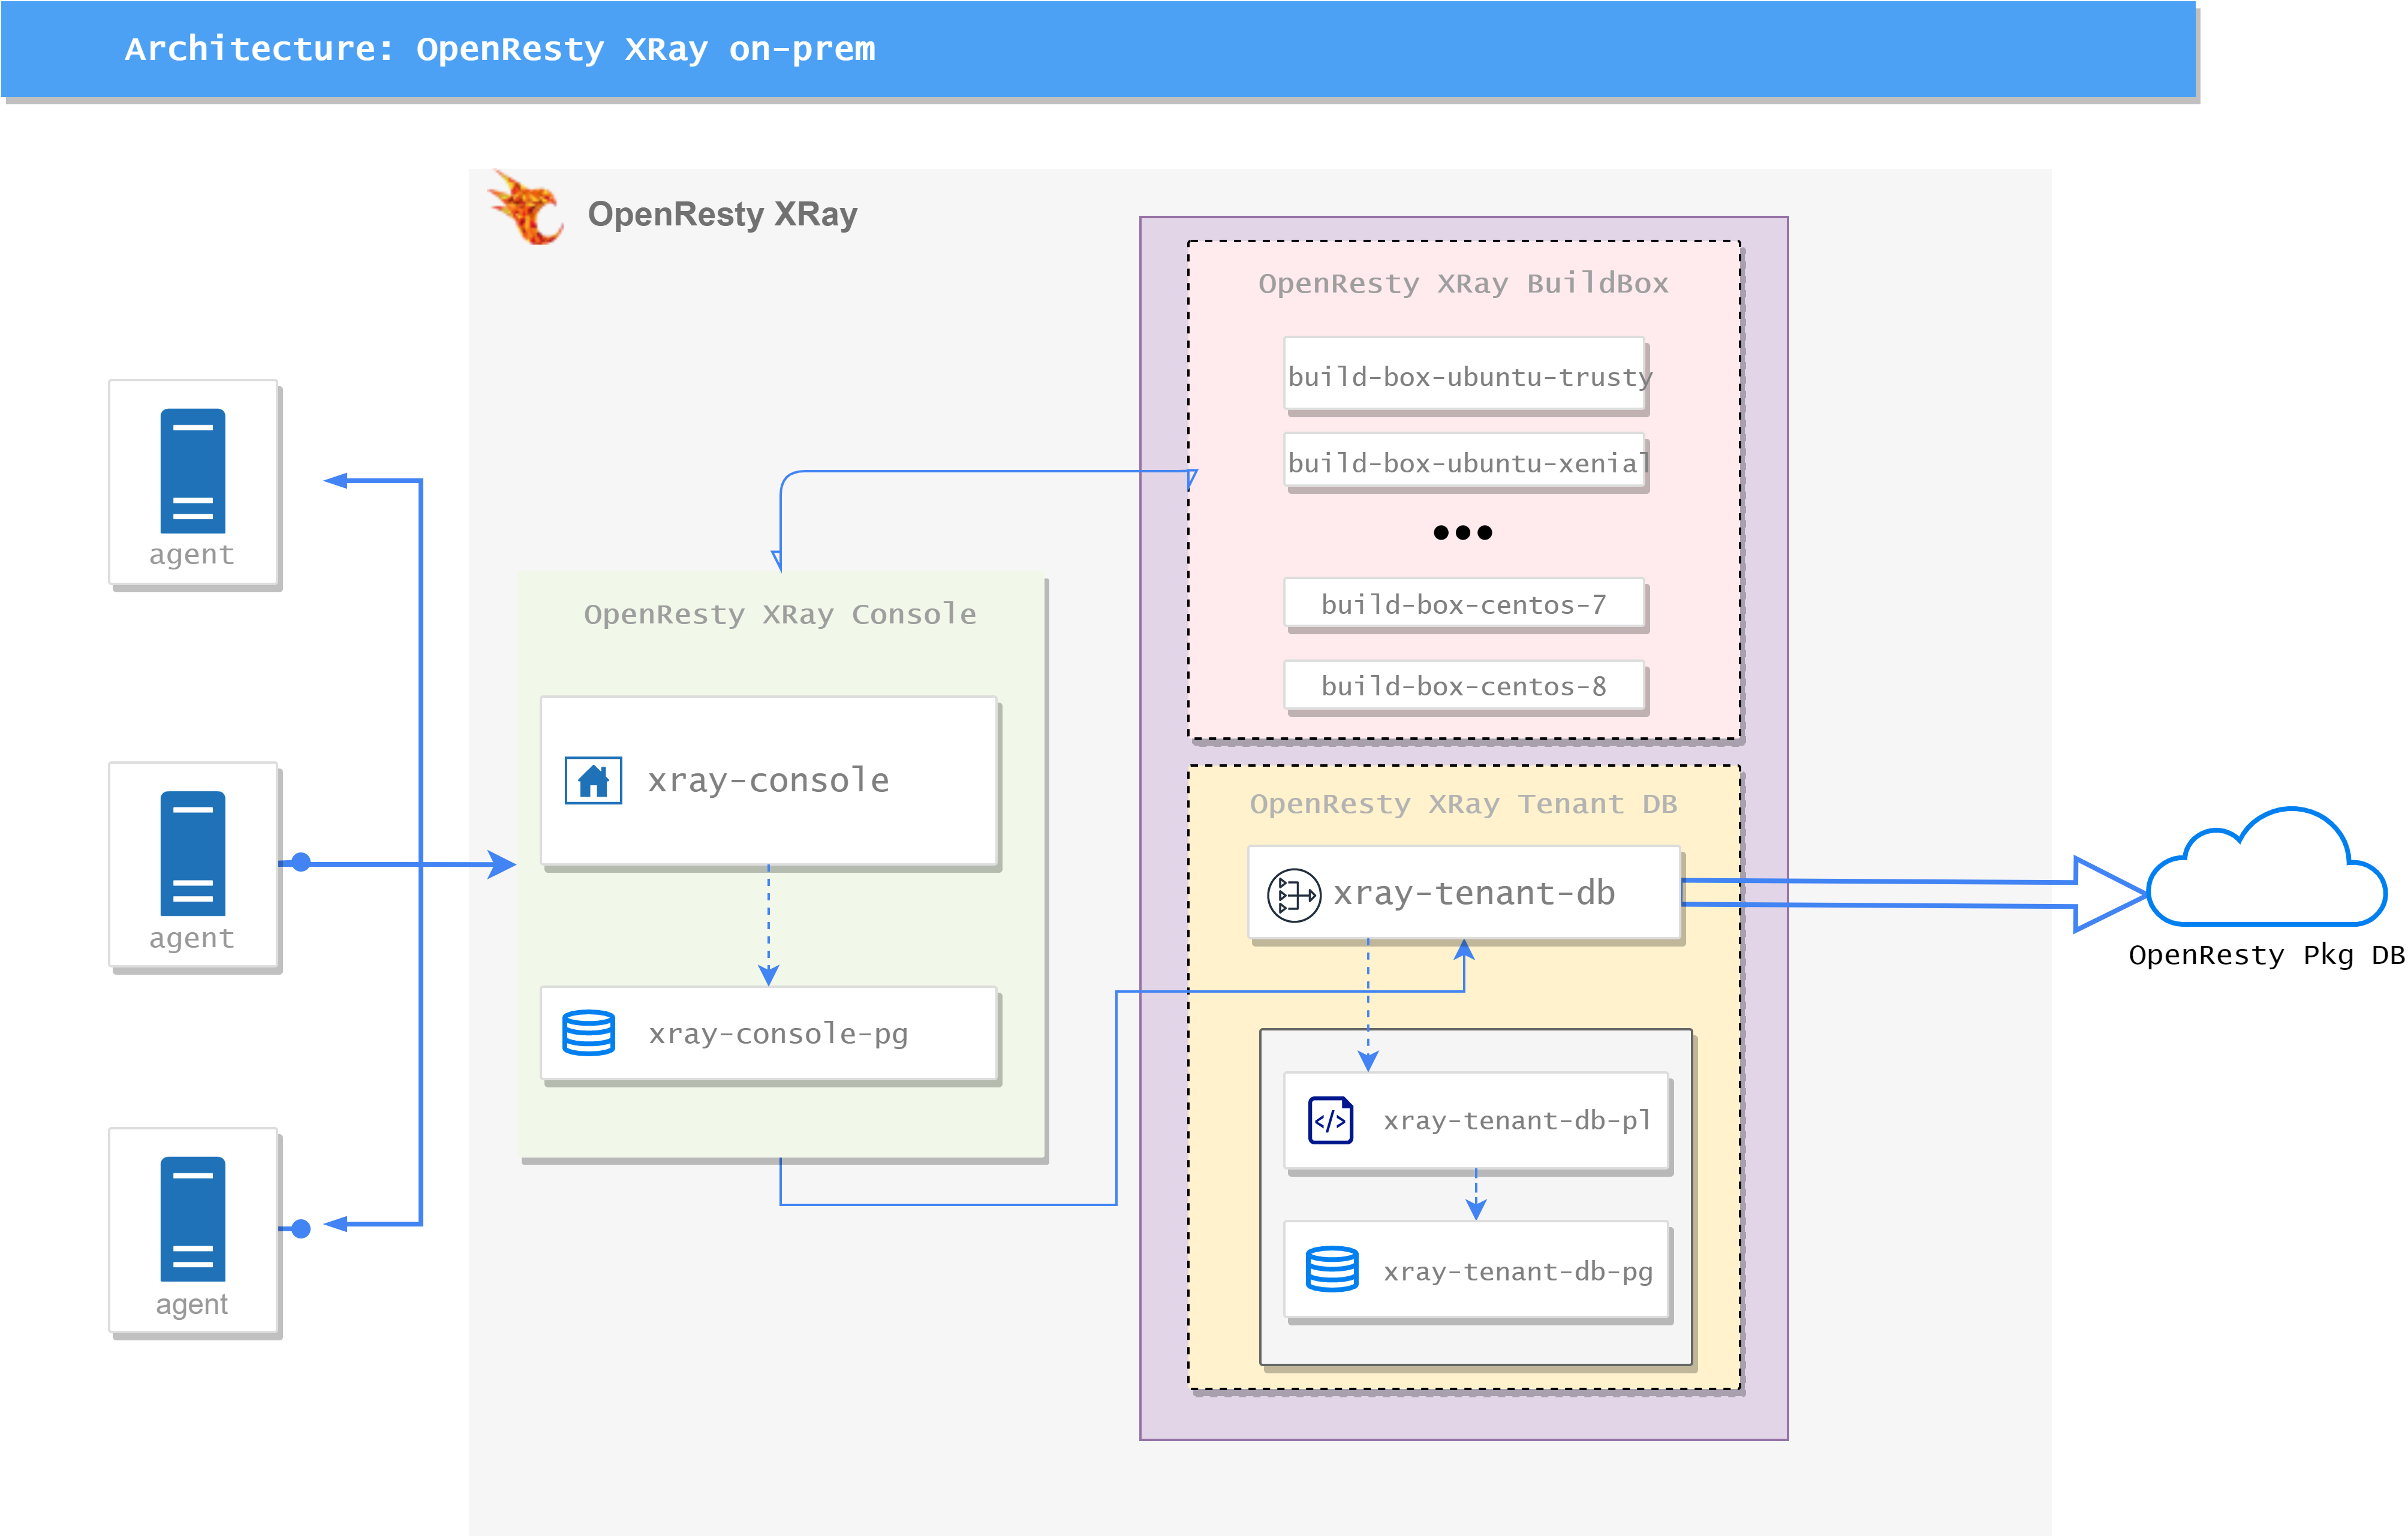
In this architecture, the console service runs in Docker containers and is managed through docker-compose. All services run on a single physical or virtual machine, while the Agent end runs on the target machine.
The XRay server is divided into three components, each with some sub-services:
- OpenResty XRay Console:
- xray-console: Provides the web service for the XRay management interface
- xray-console-pg: Serves as the database backend for the web service
- OpenResty XRay BuildBox:
- build-box-[dist]: Backend service for building XRay tools.
distrepresents the corresponding operating system distribution
- build-box-[dist]: Backend service for building XRay tools.
- OpenResty XRay Tenant DB:
- xray-tenant-db: Provides a query interface for
xray-consoleservice andbuild-box-[dist], following the order of ‘private library -> public library’. This service will only initiate query requests to the public library, and no data will be uploaded to the public library - xray-tenant-db-pl: Provides a private software database for customers
- xray-tenant-db-pg: Serves as the database backend for the customer’s private software database
- xray-tenant-db: Provides a query interface for
Installation
Console Server
1. Hardware Requirements
- Network: No need for public IP or exposed listening ports, but it needs to be able to access the internet, and the machine running the Agent can access this machine
- Memory: At least 4GB recommended, 16GB preferred
- CPU: At least 2C recommended, 4 cores preferred
- Hard Disk: At least 500GB recommended, 1TB or more preferred. Persistent data is stored in the
/datadirectory and will continue to grow over time
Note: Based on current experience, the data growth for 1 Agent sampling periodically is approximately 10GB for 30 days
2. Access to the Public Network
The console service needs to connect to the internet to access the XRay PkgDB service. This service provides query and download services for common Linux distribution software repositories, enabling XRay to support analysis of most open-source software and libraries in the system.
Special Note: The process of accessing the public network only involves querying and downloading actions, and no private data will be uploaded to the server on the public network by the console service.
3. Operating System
Since Docker service is used, we recommend using Linux distributions that natively support Docker, including:
Ubuntu >= 18.04CentOS >= 7Fedora >= 32Debian >= 10RHEL == 7
4. Docker-Compose
For Docker installation documentation, please refer to: https://docs.docker.com/engine/install/
After installing Docker, remember to enable the Docker service
For Docker-Compose installation documentation, please refer to: https://docs.docker.com/compose/install/
5. Deployment Certificates (Optional)
If you need to use custom certificates, please place the certificate for the corresponding domain of the XRay server in the /data/orxray-console/cert/ssl.crt and /data/orxray-console/cert/ssl.key paths. These certificates will be used for:
- Accessing the console service via HTTPS using a browser
- Communication between the Agent end and the console service
If you skip this step, the console service will use built-in self-signed certificates.
6. Access Control IP Whitelisting (Optional)
If you need to support IP whitelisting for the Console’s web service, you can follow these steps. Please create a new directory, /data/orxray-console/acl, under the /data/orxray-console directory and put the configuration file /data/orxray-console/acl/whitelist.conf in the directory. The format of this configuration file is as follows (see also the detailed documentation for instructions https://nginx.org/en/docs/http/ngx_http_access_module.html):
allow 10.0.0.3;
allow 192.168.1.0/24;

# more IPs or CIDRs for the whitelist here

deny all; # Don't forget this one, IPs that don't match the above will be rejected
Note that if you change this configuration, you need to restart the console for it to take effect.
7. Configuration File Details
In the config.env file, there are some important environment variables that need to be configured. Below is a detailed explanation of each environment variable:
XRay Console Configuration
XRAY_CONSOLE_HOST: Set to your XRay console’s hostname, e.g.,xray.example.com.XRAY_CONSOLE_PORT: Set to your XRay console’s port number, default is443. You can adjust the listening port exposed bydocker-composeby modifying this environment variable.
XRay HTTP Proxy Configuration (Optional)
In case your network requires an http proxy to connect to the Internet, you need to configure the following variables:
XRAY_HTTP_PROXY: The environment variable is used to configure HTTP proxy servers for HTTP and HTTPS outgoing requests, such ashttp://proxyserver.example.com:8080.XRAY_HTTP_PROXY_AUTHORIZATION: The environment variable is used to configure the authentication header of the HTTP proxy server for HTTP and HTTPS outgoing requests, i.e. the value ofProxy-Authorization.
XRay Tenant Database Configuration
XRAY_TENANT_DB_PORT: Set to your XRay tenant database’s port number, default is80. You can adjust the listening port exposed bydocker-composeby modifying this environment variable.
Time Series Database Cleanup Policy Configuration
TSDB_CLEANUP_PERIOD_DAYS: Set the cleanup period for the Time Series Database, in days. For example, setting it to90means the Time Series Database should be cleaned up after 90 days.TSDB_ARCHIVE_RETENTION_DAYS: Set the number of days to retain archived data in the Time Series Database. For example, setting it to10means the Time Series Database should retain 10 days of archived data.
Log Retention Policy Configuration
LOG_RETENTION_DAYS: Set the number of days to retain logs. For example, setting it to15means 15 days of logs should be retained.LOG_ARCHIVE_CLEANUP_DAYS: Set the number of days to clean up archived logs. For example, setting it to30means archived logs should be cleaned up after 30 days.
These environment variable configurations should be adjusted according to your actual needs.
8. Deployment and Startup
First, use the Docker-Registry username and password provided in the email to log in to our private Docker Registry.
docker login registry.openresty.com
Then, use the docker-compose.yml provided as an attachment in the email as the configuration file. It is recommended to place it at /opt/orxray/docker-compose.yml location, and place the config.env file from the attachment at /opt/orxray/config.env location.
Startup command:
$ docker-compose -f /opt/orxray/docker-compose.yml --env-file /opt/orxray/config.env -p orxray config -q \
    && docker-compose -f /opt/orxray/docker-compose.yml --env-file /opt/orxray/config.env -p orxray up -d
To check the startup status, execute the following command and check whether the State field in the output is all UP
docker-compose -f /opt/orxray/docker-compose.yml --env-file /opt/orxray/config.env -p orxray ps
At this point, the console service has been deployed and can be accessed using the configured domain name. Like: https://example.com
Note: If you access the management backend through a reverse proxy server, you need to make the following changes:
- You need to enable websocket support on the reverse proxy service, otherwise it will affect the communication between the Agent and the console service.
- You need to enable
X-Real-IPon the reverse proxy server to pass the access IP address to the backend, so that the console service can get the IP address of the Agent end.
9. Arm64 Support (Optional)
If you need OpenResty XRay to support the arm64 architecture, you can use the docker-compose-arm.yml file for deployment.
Make sure that the docker-compose.yml service has been deployed on the x86_64 architecture machine and that the XRAY_CONSOLE_PORT (default value is 80) and XRAY_TENANT_DB_PORT (default value is 443) ports are open to the internal network.
Deploy docker-compose-arm.yml on the arm64 architecture machine in the same internal network and configure as follows:
- Open the
config.envfile. - Add or modify the following environment variables:
XRAY_CONSOLE_IP: Set to the internal network IP address of the x86_64 machine.XRAY_CONSOLE_PORT: Set to your XRay console’s port number, default is443. You can adjust the listening port exposed bydocker-composeby modifying this environment variable.XRAY_TENANT_DB_IP: Set to the internal network IP address of the x86_64 machine.XRAY_TENANT_DB_PORT: Set to your XRay tenant database’s port number, default is80. You can adjust the listening port exposed bydocker-composeby modifying this environment variable.
For example:
# config.env file
# ...

XRAY_CONSOLE_IP=192.168.1.100
XRAY_CONSOLE_PORT=443
XRAY_TENANT_DB_IP=192.168.1.100
XRAY_TENANT_DB_PORT=80
Execute the following command on the arm64 server to complete the deployment:
$ docker-compose -f /opt/orxray/docker-compose-arm.yml \
    --env-file /opt/orxray/config.env -p orxray up -d
After the deployment is complete, OpenResty XRay’s support for the arm64 architecture is completed.
Agent
The XRay Agent runs on the target machine. After the Agent is installed, it communicates with the self-deployed console service, and the installation of the Agent is also completed with the help of the console service:
After accessing the console service backend in the browser, use the username and password provided in the email to log in. After logging in, you can see the installation guide and the supported operating systems. Follow the prompts of the installation guide to install the Agent.
After installing the Agent, you can modify the password and add users on the left User tab.
Operations
Console Service Log Viewing
docker-compose -f /opt/orxray/docker-compose.yml --env-file /opt/orxray/config.env -p orxray logs -t
Check Configuration File Validity
docker-compose -f /opt/orxray/docker-compose.yml --env-file /opt/orxray/config.env -p orxray config -q
Upgrade Service
Step 1: Download the Latest Configuration File
Download the latest docker-compose.yml configuration file from the email attachment or specified channel.
Step 2: Execute the Upgrade
Copy the new configuration file to the deployment directory and restart the service:
$ cp docker-compose.yml /opt/orxray/docker-compose.yml
$ docker-compose -f /opt/orxray/docker-compose.yml --env-file /opt/orxray/config.env -p orxray config -q \
    && docker-compose -f /opt/orxray/docker-compose.yml --env-file /opt/orxray/config.env -p orxray down \
    && docker-compose -f /opt/orxray/docker-compose.yml --env-file /opt/orxray/config.env -p orxray up -d
Time Series Database Upgrade
If upgrading from a version lower than 26.2.1 to version 26.2.1 or above, you need to execute the following command to upgrade the time series database:
docker exec -it orxray-xray-console-pg-1 bash /docker-entrypoint-upgrade.d/upgrade_tsdb_data.sh
Note: This operation only needs to be performed once when upgrading across version 26.2.1.
Check Service Status
docker-compose -f /opt/orxray/docker-compose.yml --env-file /opt/orxray/config.env -p orxray ps
Volume persistence and Backup
/data Directory Details
The /data directory is a persistent data volume mounted on the host machine. This directory stores persistent data generated during the running of the XRay service, including database files, log files, archive files, etc. Even if the XRay-related containers are restarted, as long as the /data directory on host machine is not deleted, the data stored in it will be retained.
It is worth noting the /data/orxray-console/archive subdirectory, which stores the archived data files of the database and jobs. The system will regularly back up these data from the previous day on a daily basis. Archive files that exceed the specified retention days will be automatically cleaned up. The following two environment variables can be used to configure the retention time of the archived data:
TSDB_ARCHIVE_RETENTION_DAYS: Configures the retention days for the database archive data, with a default value of 10 days.LOG_ARCHIVE_CLEANUP_DAYS: Configures the retention days for the job archive files, with a default value of 30 days.
It is recommended to reasonably set the values of these two parameters according to the actual disk space and data retention requirements.
Additionally, it is advisable to regularly back up the /data directory and use a dedicated disk to mount this directory whenever possible to avoid exhausting the system disk space due to excessive persistent data generated by XRay.