OpenResty XRay™ On-Premise Deployment on Kubernetes
Name
Installation and deployment guide for On-Premise (kubernetes) version of OpenResty XRay.
Table of Content
Overview
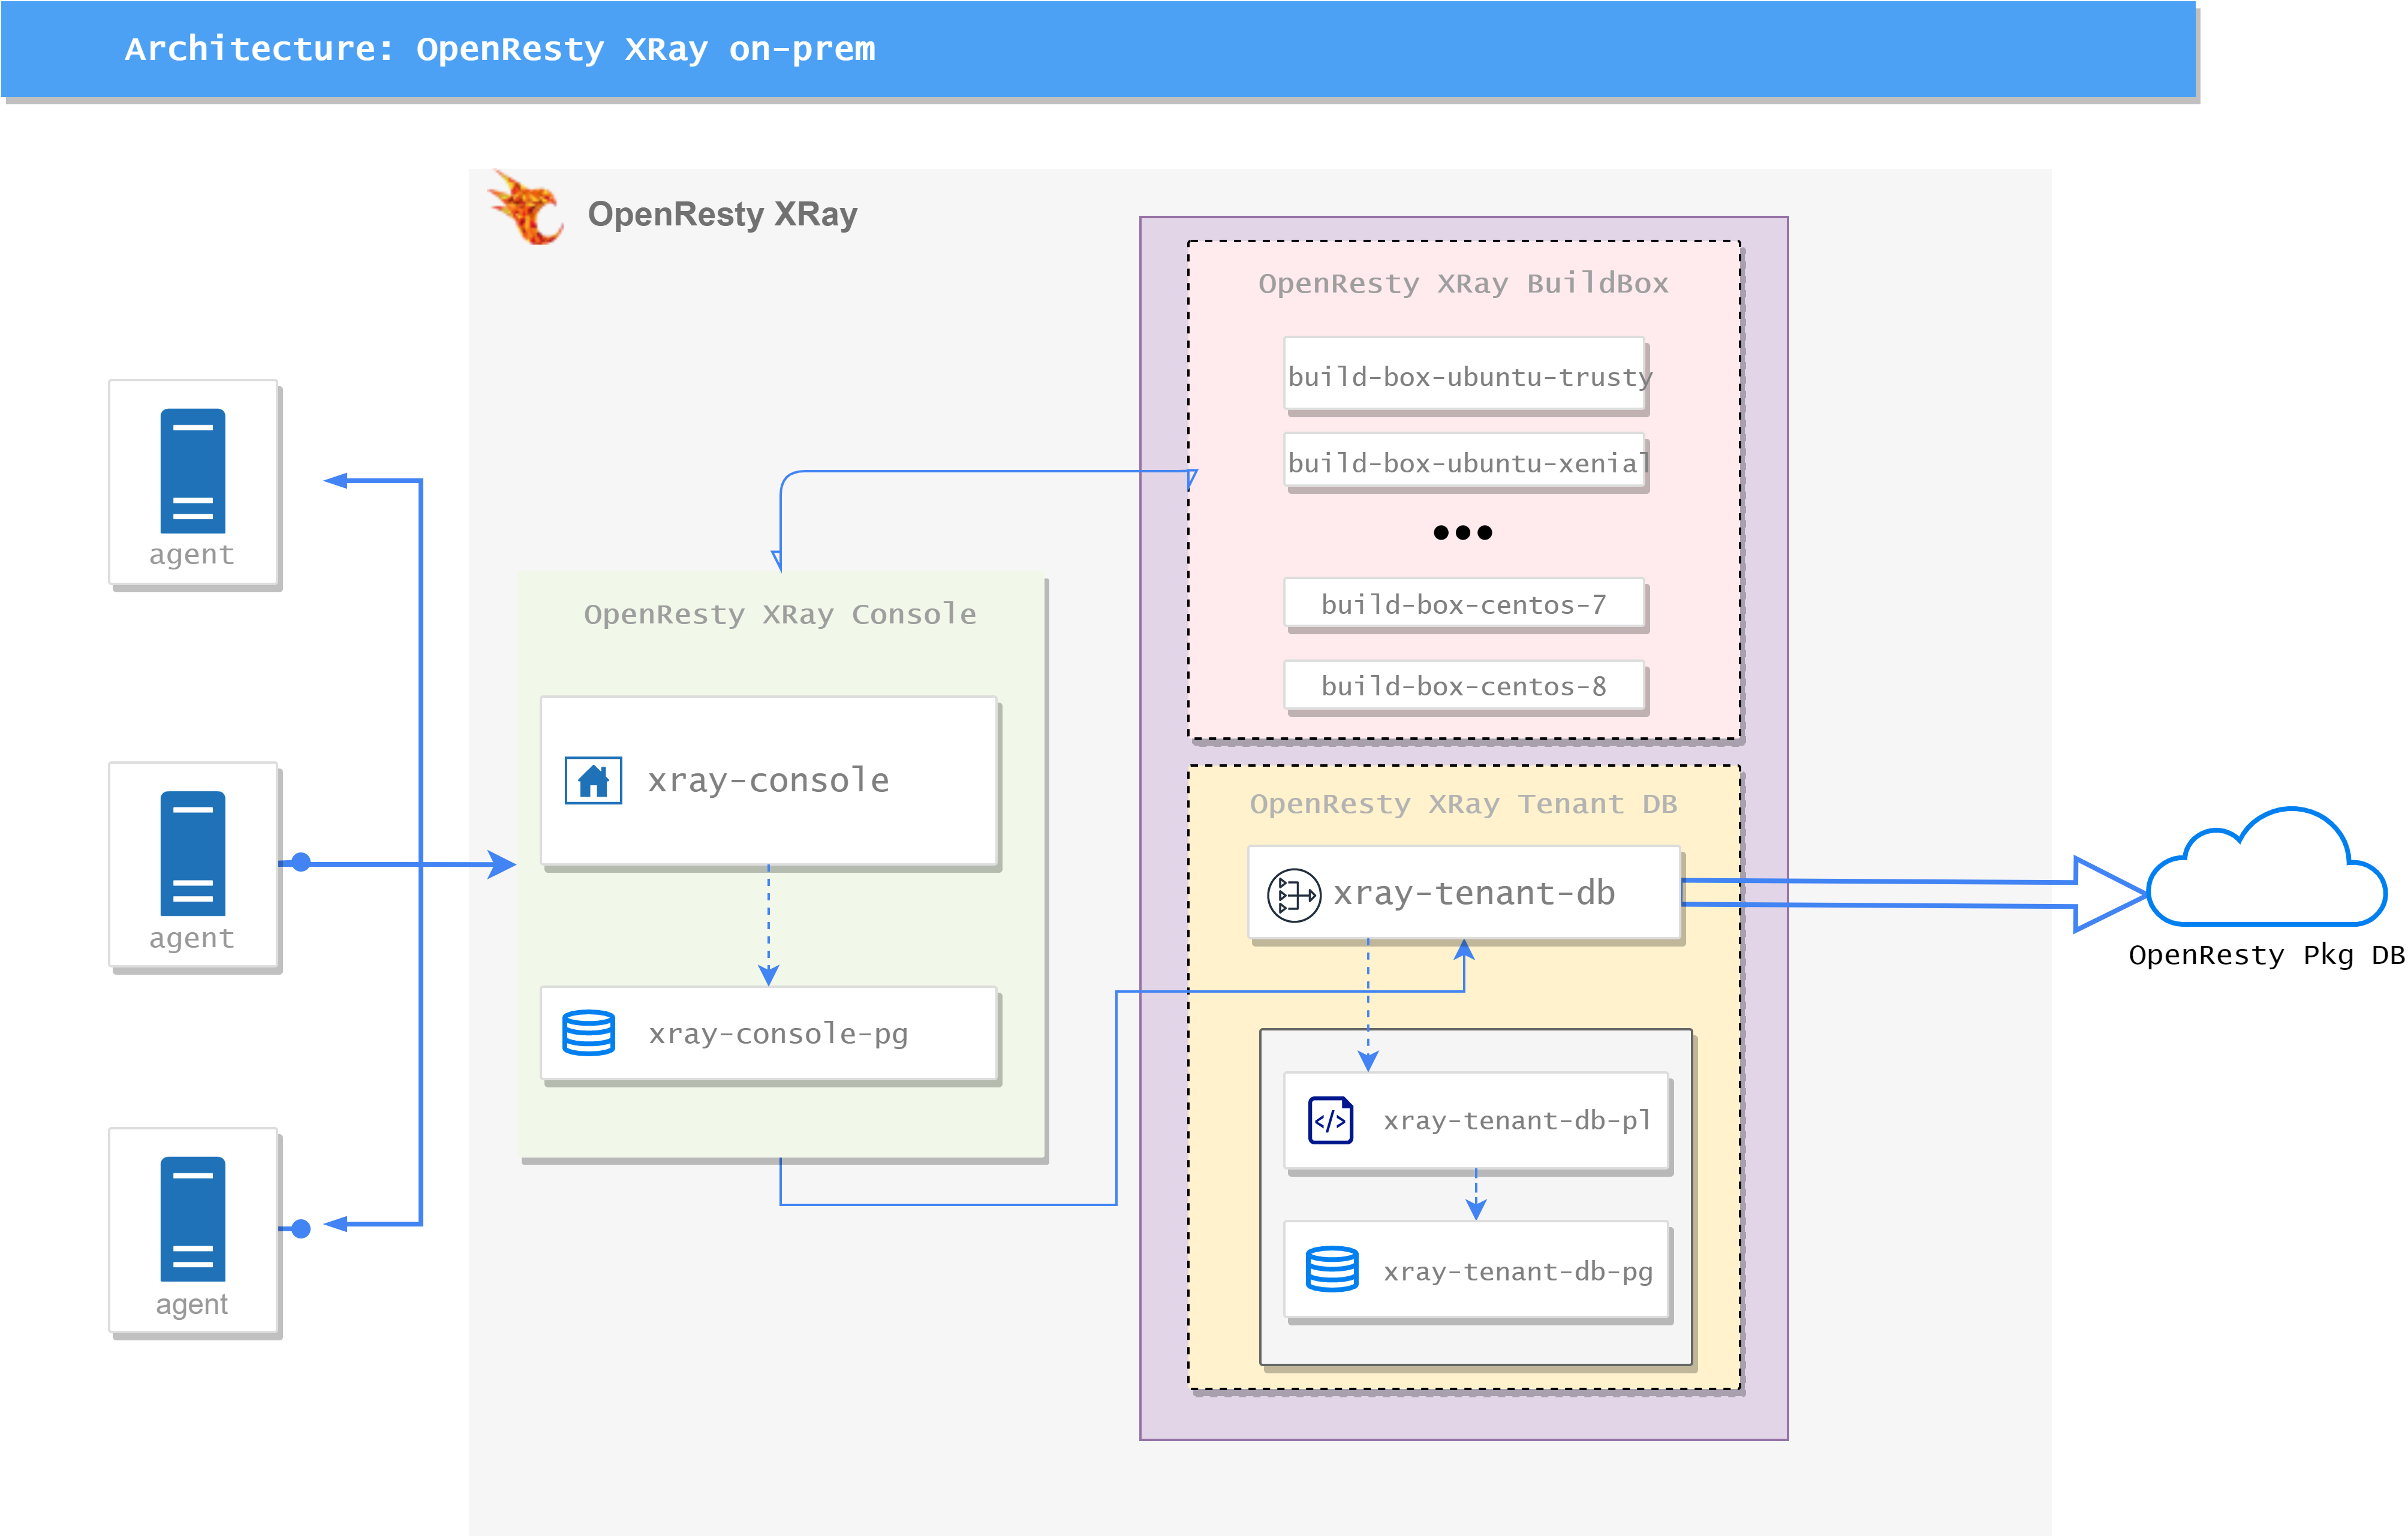
OpenResty XRay (XRay) On-Premises edition consist of two parts: Console Server and Agent.
The Console Server runs in docker container, managed by kubernetes, and the Agent runs on the target machine.
XRay Console Server consist of there parts:
OpenResty XRay Console:- xray-console: web service of console, provide a web UI based dashboard.
- xray-console-pg: postgresql database for
xray-console.
OpenResty XRay BuildBox:- build-box-[dist]: the backend service for building xray tools, where
distrepresents the corresponding Linux distro. - xray-tenant-db: provide query API for
xray-consoleandbuild-box-[dist], will query first localtenant-dbservice and then remotepkg-dbThe service will only request queries to our remote public pkg-db, and no data will be uploaded to our public pkg-db - xray-tenant-db-pl: provide API for private package info.
- xray-tenang-db-pg: postgresql database for
xray-tenant-db-pl.
- build-box-[dist]: the backend service for building xray tools, where
Installation
Console Server
1. Hardware requirements
- A basic Kubernetes platform
- 1Ti + 500Gi hard disk for the
xray-consolepod - 100Gi hard disk for the
build-boxcontainer of thetenant-dbpod - 2 x 10Gi hard disk for the
tenant-dbcontainer of thetenant-dbpod - Do not use NFS for storage, there will be permission issues
- At least 256MB of free memory for each container
- console pod can connect to the Internet
Note: Based on our experience, the data sampled by a single agent node is about 10G for 30 days.
2. access private registry
First, create the namespace and the secret for kubernetes to access the openresty image repository using the username and password provided in the email:
# create namespace here
kubectl create ns openresty-xray

# create secret
kubectl create secret docker-registry openresty-xray \
  --docker-server=registry.openresty.com \
  --docker-username=<docker-registry username> \
  --docker-password=<docker-registry password> \
  -n openresty-xray
3. create secret for certificate
If you need to use a custom certificate, you need to perform this step, or the Console Server will use the built-in certificate (please ignore browser warnings when accessing the dashboard)
Copy XRay server site certificate files into cert/ssl.crt and cert/ssl.key, and then:
kubectl create secret generic cert-secret --from-file=./cert/ -n openresty-xray
Find the following lines in kubernetes.yml and remove the comments to use the custom certificate:
#- mountPath: /usr/local/orxray-console/conf/cert
#  name: cert
#  readOnly: true

# ...
# ...

volumes:
#- name: cert
#  secret:
#    secretName: cert-secret
PS: the environment variable in kubernets.yml should be consistent with the domain name in certificate file:
        - name: CONSOLE_HOST
          value: xxx.xx.com
The usage of these certificate files are:
- Access XRay Console Dashboard through https protocol.
- Security communication between Agent and Console Server.
4. default persistent volume
Deploying Console Server requires data persistence, and we provide a default persistence scheme that uses the disks on the given node
First, add a label to the selected node:
kubectl label node <node_name> app=openresty-xray-console
Then, create the persistent volume, the persistent data will stored in the /data directory:
# use the `kubernetes-pv.yml.sample` from email
kubectl apply -f kubernetes-pv.yml.sample
5. deployment and startup
use the
kubernetes.ymlfile from email
kubectl apply -f kubernetes.yml
6. access the Console Server
We use the hostPort in kubernetes.yml to expose 443 port, you can just use https://your-domain-name to access the Console Server Dashboard.
Agent
Agent side runs on the target machine, after installation, the agent side will communicate with the Console Server deployed in previous steps, the agent’s installation itself is also cooperated with server side:
Access your dashboard in your browser, login with the initial username and password from the email (you may change the password after first login). You’ll be greeted with installation guide after login, follow the installation guide to install the agent on the target machine.
Basic Ops
Service upgrade
Backup your kubernetes.yml first:
$ cp /opt/orxray/kubernetes.yml /opt/orxray/kubernetes.yml.bak
Use the kubernetes.upgrade.yml from email, and then:
$ kubectl apply -f kubernetes.upgrade.yml
Component Upgrade
Stop the old pods first, then enable the new pods, and wait for the new pods to start successfully, then the upgrade will be successful!
The kubernetes-pods.yml file is provided in the upgrade email attachment.
$ kubectl delete -f kubernetes-pods.yml
$ kubectl apply -f kubernetes-pods.yml
There is no need to delete the old PVCs or the corresponding PVs. Because the PV is RWO (Read-Write-Once) attributed, if the PVC is deleted, the PV will also need to be deleted and then re-built (this does not affect data that has already been persisted).
Common Troubleshooting Commands
Check Service POD Status
$ kubectl get pods -n openresty-xray

NAME                                  READY   STATUS    RESTARTS   AGE
build-box-centos-7-75c954d87d-h6fkz   1/1     Running   0          18h
xray-console-5d457bb49d-q49f8         1/1     Running   0          17h
xray-console-pg-64df4cbd86-tm44n      1/1     Running   0          18h
xray-tenant-db-69d9cbd77d-nccnb       1/1     Running   0          18h
xray-tenant-db-pg-845d5cb674-rrjz8    1/1     Running   0          18h
xray-tenant-db-pl-859c5c8dfd-xk7sg    1/1     Running   0          18h
View Console Service Logs
$ kubectl logs --tail=10 -n openresty-xray -l app=xray-console -c xray-console
Check Service Status
$ kubectl describe pod <POD-NAME> -n openresty-xray
Determine Which Node the Pod is Running On
kubectl get pod <POD-NAME> -n openresty-xray -o wide
Login to Container
kubectl exec -it <POD-NAME> -c <CONTAINER-NAME> -n openresty-xray -- /bin/bash
Delete K8s Services and Persistent Data
# Query the nodes where OpenResty XRay is running
kubectl get pods -n openresty-xray -o wide

# Stop services
kubectl delete -f kubernetes.yml
kubectl delete pvc -n openresty-xray --all
kubectl delete kubernetes-pv.yml.sample

# Switch to the node and execute deletion commands
rm -fr /data/orxray-build-box /data/orxray-compile-box /data/orxray-console /data/orxray-pkg-db